First, turn off the water supply valves under the sink and open the faucet to release pressure.
Gather tools like an adjustable and basin wrench, along with safety gear.
Loosen and disconnect the hot and cold supply lines carefully, managing residual water with towels or a bucket.
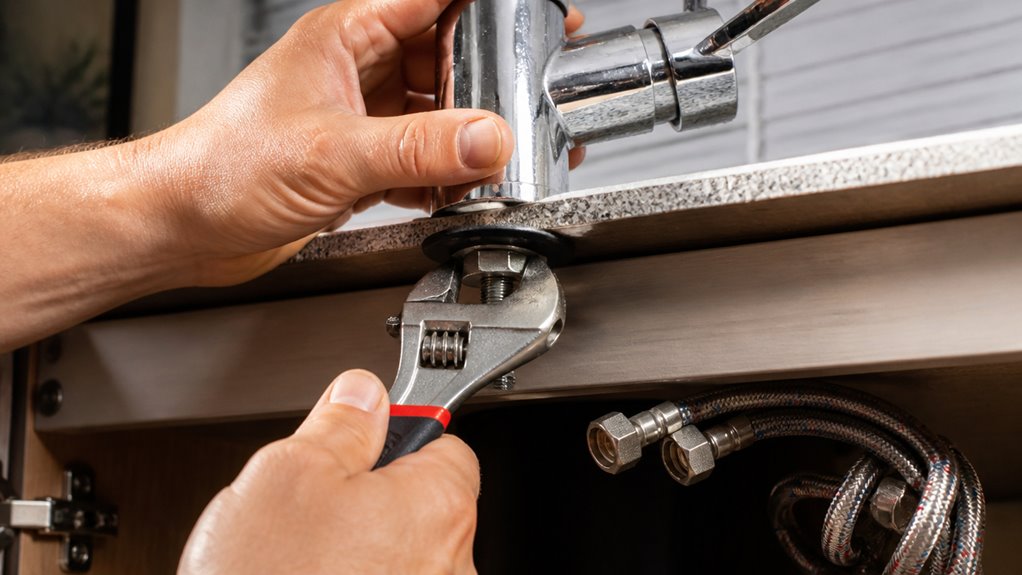
Then, remove mounting nuts using a basin wrench, applying penetrating oil if stuck.
Lift the faucet straight up to avoid damage, and clean the area afterward.
Keep going to guarantee a smooth, thorough removal process.
Key Takeaways
- Shut off water supply valves and open faucet handles to relieve pressure and drain residual water before starting faucet removal.
- Use adjustable and basin wrenches to loosen and disconnect hot and cold supply line nuts carefully, managing any drips with towels or a bucket.
- Apply penetrating oil to corroded or stuck mounting nuts and wait before loosening them with a basin wrench from underneath the sink.
- Fully remove all mounting hardware and disconnect any remaining hoses or connections securing the faucet before attempting removal.
- Lift the faucet straight up, gently breaking any seal with a plastic putty knife, then clean and inspect the sink area for damage or residue.
Turn Off Your Water Supply

Begin by shutting off your water supply to prevent leaks during faucet removal.
Start by turning off your water supply to avoid leaks when removing the faucet.
Locate the hot and cold shutoff valves under the sink and turn them clockwise to close them.
If these valves are missing, shut off the main water supply for your home.
After closing the valves, turn on the faucet handles to release any remaining water pressure and drain residual water from the lines.
Place a bucket or towel beneath the cabinet to catch drips or minor leaks.
Before loosening any connections, verify both hot and cold water lines are fully isolated to avoid water flow.
Taking these steps guarantees a dry, safer workspace and prevents water damage while you proceed with disconnecting and removing the faucet.
For additional safety, you may also open a nearby faucet to relieve pressure in the pipes before starting work.
Gather Essential Tools and Safety Gear
When you’re getting ready to dive into a project, it’s super important to gather some essential tools. For tight connections, an adjustable wrench and a basin wrench will be your best friends. Trust me, you’ll be glad you have them on hand!
Don’t forget to protect your workspace, too. Lay down some towels to catch any drips—nobody likes a mess! And make sure you’ve got a strong light nearby for better visibility; it makes a world of difference when you’re working under the sink.
Oh, and safety first! Always wear safety glasses to shield your eyes from any debris that might come flying your way. It’s a simple step that can save you a lot of trouble down the line!
Before starting, remember to turn off the water supply to avoid any unexpected leaks or water damage.
Must-Have Tools
Although removing a faucet can seem straightforward, having the right tools and safety gear ready is essential for a smooth process.
Start with an adjustable wrench to loosen supply-line connections and a basin wrench to reach mounting nuts in tight spaces.
Keep penetrating oil handy for corroded hardware. Use a flashlight or strong work light to illuminate the cabinet area.
Always wear safety glasses to protect your eyes from debris or splashes. Prepare a bucket or towel to catch drips and protect the cabinet base.
Having these tools and gear organized before you begin prevents delays and guarantees safety while working under the sink.
Proper preparation lets you focus on disassembly without interruptions or hazards.
For faucet removal, a RIDGID Handheld Basin Wrench is highly recommended for its compact design and ability to maneuver in confined sink areas.
Workspace Protection Tips
Having the right tools on hand sets the stage for protecting your workspace during faucet removal.
Begin by laying a towel or rag inside the cabinet to shield the base from scratches and absorb any water drips.
Place a bucket beneath the sink to catch residual leaks when disconnecting supply lines.
Keep an adjustable wrench and basin wrench nearby to avoid fumbling and potential damage.
Use a flashlight to illuminate tight, dark spaces clearly.
If hardware is corroded or stuck, have penetrating oil ready to ease removal without forcing parts.
Organize your tools within easy reach to prevent accidental drops or spills.
These steps help maintain a clean, safe work environment and minimize damage to your sink cabinet while you work efficiently.
Additionally, understanding the importance of corrosion-resistant materials can help you anticipate and manage stubborn valve fittings during removal.
Safety Gear Essentials
You should always wear safety glasses when working under the sink to protect your eyes from debris, splashing water, or accidental tool slips.
Along with glasses, consider wearing gloves to safeguard your hands from sharp edges, harsh chemicals, and hot water.
Use knee pads or a cushioned mat to prevent discomfort while kneeling.
Make certain proper lighting with a flashlight or work light to avoid mistakes and reduce eye strain.
Wear old clothes or a protective apron, as plumbing work often involves dirt and water.
Before starting, remove any jewelry to prevent snagging or electrical hazards.
Proper safety gear minimizes risks and allows you to focus on the task efficiently.
Prepare all tools and protective items before you begin for a safer, smoother faucet removal.
For hand protection, choose gloves with chemical resistance and good grip to handle slippery or hazardous materials safely.
Disconnect Water Supply Lines
To get started, grab an adjustable wrench and loosen those supply-line fittings. Just remember, you’ll want to turn the connection nuts counterclockwise. Take your time with this step—rushing can lead to damaged components, and nobody wants that!
As you work, keep a towel or bucket handy to catch any residual water drops. It’s all about staying organized, so disconnect one line at a time. This way, you can keep everything in order and minimize any spills. Happy disconnecting! Always ensure you disconnect the power supply before starting any work to avoid electrical hazards.
Loosen Supply-Line Fittings
Loosen the hot and cold supply-line fittings with an adjustable wrench by turning the connection nuts counterclockwise.
Work on one line at a time to avoid confusion and reduce water spills. If the fitting’s fixed, use a second wrench to hold it steady while you turn the nut.
Apply steady, controlled force to prevent stripping or damaging the fittings. Expect a few drops of water to leak after loosening.
Keep a bucket or towel underneath to catch any drips. If the fittings feel stuck, apply penetrating oil and wait a few minutes before trying again.
Confirm both hot and cold shutoff valves are fully closed before loosening to avoid water flow. Once loose, don’t remove the nuts yet; this will be covered in the next step.
Regular maintenance and inspections help identify issues like corrosion that can make fittings harder to loosen over time.
Remove Connection Nuts
After loosening the supply-line fittings, fully remove the connection nuts by turning them counterclockwise.
Work on one supply line at a time to minimize confusion and prevent cross-thread damage.
Hold the fixed fitting steady with one wrench while loosening the nut with another if necessary.
Expect minor residual water drops despite the shutoff. Use a bucket or towel underneath to catch drips.
Choosing the correct shut-off valve size ensures a smooth disconnection process without damaging the plumbing.
| Step | Tool Needed | Tip |
|---|---|---|
| Loosen nut | Adjustable wrench | Turn counterclockwise |
| Hold fitting | Second wrench | Prevent fitting rotation |
| Catch drips | Bucket/towel | Place under connection |
This method guarantees a safe, controlled disconnection of water supply lines before faucet removal.
Manage Residual Water Drops
When disconnecting water supply lines, you’ll notice residual water drops even with the shutoff valves closed. This is normal and requires proper management to prevent water damage and mess under the sink.
Follow these steps to control residual water drops effectively:
- Prepare the workspace: Place a bucket or towels beneath the supply lines to catch drips and spills as you loosen fittings.
- Loosen fittings slowly: Turn connection nuts counterclockwise gradually to allow trapped water to drain out safely without sudden splashes.
- Use absorbent materials: Keep rags handy to wipe any drops immediately and avoid pooling water that could damage cabinetry or flooring.
It is also important to ensure the shut off valve is fully closed before disconnecting to minimize water flow and reduce the risk of leaks.
Remove Faucet Mounting Hardware
Locate the mounting nuts or clips securing the faucet to the sink from underneath the cabinet. Use a basin wrench or a similar tool designed for tight spaces to reach these fasteners.
If the nuts are corroded or stuck, apply penetrating oil and wait about 15 minutes before attempting removal. Remove any deck plate, escutcheon, screws, lock washers, or gaskets present around the faucet base.
Turn the mounting nuts or clips counterclockwise to loosen and remove them. Be sure all mounting hardware is fully detached to avoid damage when lifting the faucet later.
Keep track of all components as you remove them for easier reinstallation or replacement. Work carefully to prevent stripping the nuts or damaging the sink surface.
Before starting, it is important to turn off the water supply to prevent water flow during the removal process.
Lift Out the Faucet Without Scratching Your Sink
With all mounting hardware fully removed, carefully lift the faucet straight up to avoid damaging the sink surface.
After removing all hardware, lift the faucet straight up to protect the sink surface.
If the faucet resists, don’t force it; gently wiggle it side to side to break the seal. Avoid using metal tools directly on the sink, as they can scratch or chip the finish.
Follow these steps to lift out the faucet safely:
- Use a plastic putty knife to carefully separate any adhesive or sealant between the faucet base and sink.
- Check for any hoses or outlet connections still attached and disconnect them before lifting.
- Maintain a firm, steady grip and lift vertically to prevent tipping that could cause damage.
Clean and Inspect the Faucet Area
After lifting the faucet free, clear away any debris, old sealant, and moisture from the sink deck and surrounding cabinet area.
Use a putty knife or scraper to remove stubborn residue without damaging surfaces. Wipe the area with a clean cloth to guarantee it’s dry.
Next, inspect the supply lines and shutoff valves for signs of corrosion, leaks, or wear.
Check the mounting surfaces and sink opening for damage, mineral buildup, or cracks that could affect the new faucet’s seal.
Remove any loose parts such as washers, screws, or gaskets left behind.
Finally, organize the removed faucet and hardware together for reference during installation.
A thorough cleaning and inspection now will help guarantee a secure, leak-free faucet replacement.
Frequently Asked Questions
How Do I Know if My Faucet Needs Replacement or Repair?
You know your faucet needs replacement if it leaks persistently despite repairs, shows significant corrosion, or has damaged components like cracked handles or spouts.
Repair is suitable for minor drips, worn-out washers, or loose connections.
Inspect for water flow issues or unusual noises.
If repairs become frequent or parts are obsolete, replacement is more cost-effective.
Always evaluate the faucet’s condition before deciding to repair or replace.
Can I Remove a Faucet Without Shutting off the Main Water Supply?
You shouldn’t remove a faucet without shutting off the water supply. Doing so risks water flooding when you disconnect supply lines. If your sink lacks individual shutoff valves, you must turn off the main water supply.
After shutting off the water, open the faucet to relieve pressure and drain remaining water. This step prevents leaks and guarantees a safer, cleaner faucet removal process. It minimizes potential damage or water waste.
What Should I Do if the Faucet Mounting Hardware Is Rusted Beyond Removal?
When rusted mounting hardware clings like stubborn roots, spray penetrating oil generously and let it soak for 15-30 minutes.
Use a basin wrench or impact driver to apply steady, controlled force.
If it still won’t budge, carefully cut the hardware with a rotary tool or hacksaw.
Always wear safety gear and protect surfaces.
After removal, clean all debris thoroughly to prepare for a secure, damage-free faucet installation.
Are There Specific Faucet Types That Require Special Removal Tools?
Yes, some faucet types need special tools. For example, single-handle faucets with cartridge valves often require cartridge pullers.
Touchless or electronic faucets may need specific screwdrivers or hex keys for sensor components. Wall-mounted faucets might require longer basin wrenches or pipe wrenches.
Always check your faucet model’s manual for recommended tools to avoid damage. Having the right tool guarantees efficient, safe removal without harming the fixture or plumbing.
How Do I Prevent Leaks After Installing a New Faucet?
Think of your faucet like a sealed envelope. If it’s not closed tight, things will leak out.
To prevent leaks, apply plumber’s tape to threaded connections before tightening. Use a basin wrench to secure fittings snugly, but don’t overtighten and damage seals.
After installation, turn water on slowly while checking all joints carefully. Tighten any loose connections immediately to guarantee a watertight, leak-free faucet.
Finish Your Faucet Removal Without Damaging the Sink
Removing your faucet is like untying a knot: methodical and careful. By turning off your water, gathering tools, disconnecting lines, and loosening mounting hardware, you gradually free the faucet without damaging your sink.
Cleaning and inspecting the area afterward guarantees a fresh start, just as clearing debris prepares a path for new growth. Follow these steps precisely to make the process smooth and efficient, leaving your sink ready for its next chapter.