To clean your kitchen sink drain pipe, start by flushing it with hot water for 1–2 minutes to soften grease and loosen debris.
Then, treat the drain with baking soda followed by vinegar, letting the fizz break down buildup before rinsing again with hot water.
Use a plunger to dislodge tougher clogs and clean the P-trap to remove trapped debris.
Regularly straining and maintaining your drain will prevent future blockages.
Explore further methods to keep your drain flowing smoothly.
Key Takeaways
- Regularly flush the drain with hot water (130°F/54°C) for 1–2 minutes to soften and push grease and debris through the pipes.
- Use a baking soda and vinegar mixture monthly to break down light grease and organic buildup before flushing with hot water.
- Remove and clean the P-trap by loosening slip nuts, rinsing with hot water, and clearing trapped grease or debris.
- Use a cup-style plunger with a tight seal and water-filled cup to dislodge clogs by pumping forcefully for 20–30 seconds.
- Employ a drain snake after plunging to break up deeper blockages, then flush the drain thoroughly with hot water.
Understanding Kitchen Sink Drain Clogs and Grease Buildup

Although kitchen sink drains handle a variety of waste materials, grease buildup remains the primary cause of clogs.
When grease cools, it solidifies and adheres to the pipe’s interior, gradually narrowing the passageway.
Over time, this layer traps food particles and soap scum, accelerating blockage formation.
You should understand that grease clogs often start near the drain’s entrance but can extend deeper into the plumbing.
This buildup reduces water flow and causes slow drainage.
Identifying grease as the main culprit helps you select appropriate cleaning methods.
Since grease is insoluble in cold water, relying on mechanical removal or chemical treatments becomes necessary.
Recognizing how grease accumulates lets you address clogs efficiently and prevents recurring blockages in your kitchen sink drain system.
Using enzyme-based formulas is recommended to safely break down grease without damaging galvanized pipes or septic systems.
Softening Grease With a Hot-Water Flush
To effectively soften grease and loosen any buildup in your drain, try running hot tap water through it for about 1 to 2 minutes.
You’ll find that really hot water works wonders compared to cold, helping to break down that oily residue much more efficiently.
Just remember to keep the water pressure steady as you do this.
It’ll help push any debris further down the pipe, making sure everything flows smoothly.
For best results, use water heated to at least 130°F (54°C) to effectively dissolve fats and avoid splashing during the flush of your drain.
Benefits of Hot Water
Regularly flushing your kitchen sink drain with hot water effectively softens grease and loosens residue that can accumulate inside the pipes. Hot water raises the temperature of congealed fats and oils, reducing their viscosity and making them easier to flush through the drain.
This prevents buildup that restricts water flow and causes blockages. Using hot water also aids in moving soap scum and food particles along the pipe walls, minimizing organic deposits. While hot water alone won’t clear severe clogs, it serves as an essential first step before mechanical cleaning.
Additionally, hot water flushes help maintain pipe hygiene by discouraging bacterial growth associated with stagnant grease. Incorporate regular hot-water rinses to improve drain function and extend the lifespan of your kitchen plumbing system. For enhanced cleaning power, some drain cleaners are specifically designed to be activated by hot water, boosting their effectiveness in grease and residue removal.
Proper Flushing Technique
When starting a hot-water flush to soften grease in your kitchen sink drain, begin by running the tap on its hottest setting for 1 to 2 minutes.
This initial flush softens light grease and helps loosen soap scum and food particles clinging to the pipe walls. Use this technique as a preparatory step before mechanical cleaning methods.
To maximize effectiveness, make sure water flows steadily to maintain heat throughout the pipe. Avoid low-temperature water, which hardens grease and worsens blockages. Use this flush regularly to prevent buildup but not as a sole solution for severe clogs. Combine with treatments like baking soda and vinegar for enhanced grease breakdown.
Executing this proper flushing technique can greatly improve drain flow and reduce maintenance frequency. Additionally, regular cleaning and maintenance help prevent microbial growth and persistent odors caused by biofilm buildup in drains, ensuring a fresher kitchen environment and reducing the risk of clogs from biofilm buildup.
How to Use Baking Soda and Vinegar to Clear Light Clogs?
To clear light clogs, pour one cup of baking soda directly into the drain, followed immediately by one cup of white vinegar. Quickly cover the drain with a stopper or cloth to focus the chemical reaction inside the pipe.
Let the mixture sit for 15 to 30 minutes; this allows the fizzing action to break down organic buildup like grease, soap scum, and food particles.
After the waiting period, flush the drain with hot tap water for 1–2 minutes to wash away loosened debris and residues.
This method is effective for routine maintenance and minor blockages near the sink’s surface but isn’t suited for severe clogs or deep pipe obstructions.
Repeat periodically to prevent buildup and maintain smooth drainage in your kitchen sink.
For best results, combine this natural flushing technique with manual extraction tools to remove any remaining hair or debris inside the drain.
How to Plunge Your Kitchen Sink Drain Effectively?
To plunge your kitchen sink drain effectively, you’ll want to start by picking out a cup-style plunger. This type is perfect for sinks because it helps create a tight seal.
Next, get your sink ready by filling it with enough water to cover the plunger cup. This step is crucial; it helps maintain suction. If you have an overflow or another basin nearby, be sure to seal those off too.
Now, it’s time to get to work! Use firm, controlled pumps for about 20 to 30 seconds. Don’t be afraid to repeat the process if needed until you see that water is draining properly again. Happy plunging!
Remember to select a plunger that fits the drain opening tightly to create a firm seal for effective suction, as recommended in Tools and Techniques.
Choosing The Right Plunger
Picking out the right plunger can make all the difference in clearing your kitchen sink drain efficiently. You’ll want a cup-style sink plunger rather than a toilet plunger, as it creates a better seal on flat surfaces.
Look for these features:
- A flexible rubber cup to conform tightly around the drain opening.
- A sturdy wooden or plastic handle for firm, controlled pumping.
- A diameter sized appropriately for your sink drain to maximize suction.
- A smooth, uncracked rubber surface to prevent air leaks.
Choosing a plunger with these characteristics guarantees you generate effective pressure and suction, increasing your chances of dislodging clogs quickly. Avoid toilet plungers with flange designs, which won’t seal properly on your sink, reducing plunging efficiency. For stubborn clogs, consider using a Husky drain auger to ensure a thorough and effective clearing.
Preparing The Sink Properly
Before plunging your kitchen sink drain, make sure the sink is properly prepared to maximize suction and prevent air leaks.
Start by running hot tap water for 1–2 minutes to soften grease and loosen debris.
Next, if you have a double basin sink, block the overflow openings and seal the second basin’s drain with a wet cloth or stopper to prevent air from escaping.
Add enough water to cover the plunger cup fully, ensuring an airtight seal.
Use a cup-style sink plunger specifically designed for sinks, as it conforms better to the drain opening.
Proper preparation maintains consistent pressure during plunging, improving the chances of dislodging the clog effectively without losing suction or forcing air through leaks.
For stubborn clogs beyond plunging, consider using a flexible drain auger to navigate tight bends and clear the blockage efficiently.
Effective Plunging Techniques
Although plunging might seem straightforward, mastering the proper technique guarantees you apply maximum force directly to the clog without losing suction. Start by selecting a cup-style sink plunger for a tight seal. Before plunging, add enough water to cover the plunger cup, which helps create suction.
To plunge effectively:
Block overflow openings or the second basin in a double sink to maintain pressure. Position the plunger over the drain firmly to prevent air leaks. Pump forcefully 6–12 times in rapid succession, focusing on consistent strokes. Repeat if water drains slowly, indicating partial blockage removal.
Following these steps optimizes pressure on the clog, increasing your chances of clearing the drain without mechanical tools or chemicals. For tougher hair clogs, consider using micro-hook technology tools designed to grab and pull debris quickly and safely.
How to Clean Your P-Trap and Remove Debris?
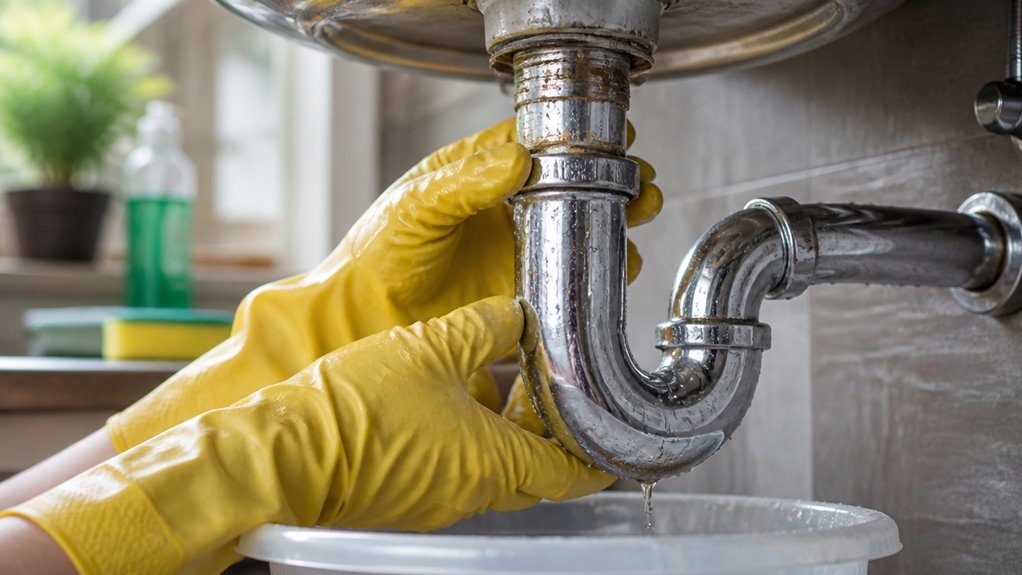
To clean your P-trap and remove debris, start by placing a bucket underneath the sink to catch any water or residue that may spill out.
Next, use a wrench or your hands to carefully loosen the slip nuts securing the P-trap to the drain pipe and tailpiece.
Carefully loosen the slip nuts connecting the P-trap to the drain and tailpiece using a wrench or your hands.
Remove the P-trap, allowing trapped water and debris to drain into the bucket.
Inspect the curved pipe section for grease, food buildup, or other blockages.
Thoroughly rinse the P-trap with hot water to loosen and wash away residue.
Once clean, reattach the P-trap by tightening the slip nuts securely but avoid overtightening to prevent damage.
Finally, run water to verify the connection is leak-free and that flow has improved.
When and How to Snake Your Kitchen Drain Pipe?
Once you’ve cleaned the P-trap and still experience slow drainage or persistent clogs, it’s time to snake the kitchen drain pipe. This method targets blockages beyond the P-trap that hot water or plunging can’t clear.
Follow these steps to snake your drain effectively:
Insert the drain snake into the waste pipe or cleanout until you feel resistance.
Rotate or push-pull the snake to break up or hook the clog.
Carefully withdraw the snake to avoid pushing debris further down.
Flush the drain thoroughly with hot water to clear loosened material.
Using a drain snake requires steady control and patience to prevent damage and ensure the blockage is fully removed.
Snaking is a precise mechanical solution for stubborn clogs in your kitchen drain pipe.
Be sure to use the right size and avoid forcing the snake to protect older or corroded pipes from potential damage.
How to Prevent Grease Buildup in Your Kitchen Sink Drain?
Regularly preventing grease buildup in your kitchen sink drain is essential to maintain smooth water flow and avoid stubborn clogs.
Consistently preventing grease buildup keeps your kitchen sink drain flowing freely and clog-free.
First, never pour hot grease or cooking oils directly down the drain, as they solidify and adhere to pipe surfaces.
After cooking, collect grease in a container for proper disposal.
Routinely flush your drain with hot tap water for 1–2 minutes to soften and push residual oils through the system.
Additionally, apply a baking soda and vinegar treatment monthly to chemically break down light grease deposits before they accumulate.
These steps minimize greasy residue, reducing the risk of blockages.
Using Drain Strainers and Routine Cleaning to Maintain Your Sink Drain
Frequently using drain strainers is one of the simplest and most effective ways to prevent food scraps and solids from entering your kitchen sink drain. Strainers act as a primary barrier, reducing the risk of clogs and buildup.
Alongside using strainers, routine cleaning is essential to maintain peak flow and hygiene.
To maintain your sink drain effectively:
- Empty and clean the drain strainer daily to prevent residue accumulation.
- Flush the drain with hot water regularly to dissolve grease and soap scum.
- Apply a baking soda and vinegar treatment monthly to break down organic buildup.
- Inspect and clean strainers for damage or wear to guarantee proper function.
Consistent use of these practices will help you avoid costly blockages and maintain a clean, efficient drain system.
Frequently Asked Questions
Can Chemical Drain Cleaners Damage My Kitchen Sink Pipes?
Yes, chemical drain cleaners can damage your kitchen sink pipes, especially if you use them frequently or leave them sitting too long.
These cleaners contain harsh chemicals that can corrode metal pipes and degrade PVC or plastic piping over time.
Instead of risking damage, it’s better to use mechanical methods like plunging or snaking.
Natural treatments like baking soda and vinegar effectively clear clogs without harming your plumbing system.
How Often Should I Replace My Kitchen Sink Drain Pipes?
You should replace your kitchen sink drain pipes every 20 to 30 years, depending on the material and condition.
PVC pipes last longer, while older metal pipes may corrode or leak sooner.
Inspect pipes regularly for cracks, leaks, or persistent clogs that don’t clear with cleaning.
If you notice deterioration or frequent problems, replacing the pipes promptly prevents water damage and guarantees reliable drainage.
Are There Eco-Friendly Alternatives to Baking Soda and Vinegar?
Yes, you can use eco-friendly alternatives like enzymatic drain cleaners that contain natural bacteria and enzymes to break down organic buildup safely.
Another option is citrus-based cleaners, which use natural acids to dissolve grease.
Avoid harsh chemicals that harm the environment.
Regular hot water flushes combined with mechanical methods, like plunging or snaking, also minimize chemical use while maintaining a clean drain pipe effectively and sustainably.
What Tools Are Best for DIY Drain Pipe Repairs?
When tackling DIY drain pipe repairs, the right tools are your trusty sidekicks.
You’ll need a pipe wrench for loosening and tightening fittings, a basin wrench to reach tight spots, and a plumber’s snake to clear stubborn blockages.
Don’t forget a bucket to catch drips and plumber’s tape for sealing joints.
These tools give you precise control, making repairs efficient and leak-free without calling a pro every time.
Can Clogged Kitchen Drains Cause Bad Odors Beyond the Sink Area?
Yes, clogged kitchen drains can cause bad odors beyond the sink area.
When debris, grease, or organic matter accumulates in the pipes, it decomposes and releases foul smells.
These odors can travel through vent pipes or gaps around plumbing fixtures.
If you notice persistent odors in adjacent cabinets or nearby rooms, it signals a blockage or buildup.
Prompt cleaning is required to prevent further odor spread and maintain sanitary conditions.
How to Clean Kitchen Sink Drain Pipe: Final Tips?
Think of your kitchen sink drain as a crucial artery in your home’s plumbing system. By regularly flushing with hot water, using baking soda and vinegar, and clearing debris from the P-trap, you keep this pathway flowing smoothly.
Don’t let grease buildup become a stubborn dam. Plunge or snake when needed, and use strainers to catch debris early.
With consistent care and practical upkeep, you’ll maintain a clean, efficient drain that prevents costly blockages and keeps your kitchen running like clockwork.