You should tighten toilet tank bolts evenly and firmly enough to secure the tank without cracking the porcelain or crushing the gasket.
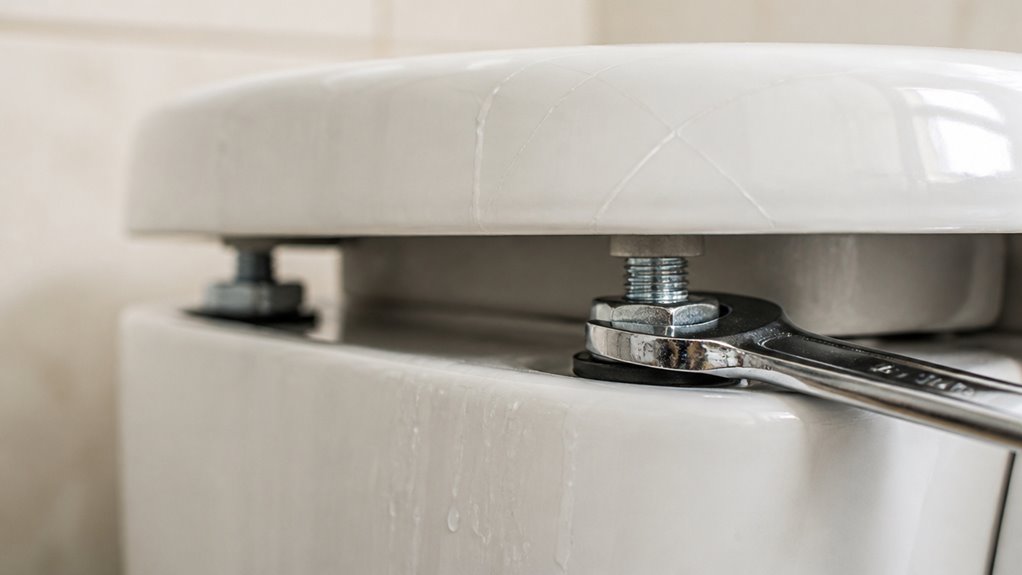
Hand-tighten the bolts first, then use a wrench to turn nuts in small, alternating increments.
Stop when the tank feels stable, level, and no longer wobbles, with firm resistance before any porcelain strain.
Avoid over-tightening to prevent leaks and damage.
Proper technique guarantees a secure, watertight seal. Here’s how to get it just right.
Key Takeaways
- Tighten bolts alternately in small quarter-turn increments to evenly distribute pressure and avoid tilting the tank.
- Hand-tighten bolts first, then use a wrench for small controlled turns until the tank feels stable and level.
- Stop tightening when firm resistance is felt without causing porcelain strain or cracking.
- Ensure gaskets are uniformly compressed without twisting or pinching to create a proper watertight seal.
- Avoid over-tightening to prevent hairline cracks in porcelain and damage to washers or gaskets.
Preparing Your Toilet Before Tightening Bolts

Before you tighten the toilet tank bolts, shut off the water supply to prevent any accidental flooding.
Next, flush the toilet to drain most of the water from both the tank and bowl, minimizing spills during the process.
Use a sponge or towel to soak up any residual water inside the tank. This guarantees a dry, clean workspace and prevents slipping when handling the bolts.
Inspect the tank-to-bowl gasket for wear or misalignment before reassembly.
When ready, hold the bolt heads steady inside the tank to avoid twisting while threading the nuts underneath by hand.
This preparation sets you up for controlled, even tightening, reducing stress on porcelain and preventing leaks or damage during the bolt adjustment phase.
For best results, apply even pressure while securing the gasket to ensure a proper seal without over-tightening the bolts, as detailed in tightening tips.
Tools for Tightening Toilet Bolts
To tighten toilet bolts, you’ll want to grab a wrench that’s made for nuts and bolts—like an adjustable or socket wrench. These tools give you the right grip and torque control you need for those pesky toilet tank bolts.
Just a heads-up, though: steer clear of oversized or slippery tools. They can easily damage your hardware or the porcelain, which is definitely not what you want!
When you’re tightening, keep it steady. Small, precise turns with a well-fitting tool will help you maintain consistent leverage and avoid any mishaps. Happy tightening!
For best results, avoid over-tightening to prevent damage to the tank and ensure a proper seal.
Essential Wrench Types
Select the right wrench to guarantee controlled, even tightening of your toilet tank bolts without risking damage. Using the proper tool makes certain you apply just enough torque to secure the tank without cracking the porcelain.
Here are four essential wrench types for this task:
- Adjustable Wrench: Offers versatility to fit various bolt sizes with precise control.
- Socket Wrench: Provides consistent torque and ease of use in tight spaces.
- Slip-Joint Pliers: Useful for gripping and steadying bolt heads inside the tank.
- Combination Wrench: Delivers a fixed-size fit for a secure grip on nuts, reducing slippage.
Each tool allows incremental tightening, helping you alternate bolts evenly and avoid over-torquing. Always prioritize tools that provide a firm grip with minimal risk of stripping or damaging hardware. For working in confined areas like inside a toilet tank, a wrench with a stubby length and slim jaws can greatly improve maneuverability.
Bolts and Nut Tools
Handling bolts and nuts properly requires the right tools designed for secure tightening without risking damage.
You’ll need a wrench that fits snugly on the nut to avoid slipping or rounding edges. An adjustable wrench or a small crescent wrench works well for most toilet tank bolts.
Avoid using pliers, as they can crush the nut. A socket wrench with an appropriate-sized socket can provide controlled torque and better access in tight spaces.
When tightening, hold the bolt head steady inside the tank with a screwdriver or pliers while turning the nut underneath.
Make sure your tools allow for short, incremental turns to prevent over-tightening. Using the correct tool guarantees even pressure on the gasket and porcelain, maintaining a secure, leak-free seal without cracking the tank.
It is also important to wear safety gear such as gloves and safety glasses to protect yourself during tightening tasks.
Grip and Torque Control
To maintain proper tightening without damaging the tank, your grip on the tools and control over the applied torque matter just as much as choosing the right wrench.
You need to apply steady, measured force to avoid over-tightening and cracking the porcelain.
Follow these steps for optimal grip and torque control:
- Hold the bolt head steady inside the tank with a pair of channel-lock pliers or a wrench.
- Use a small adjustable wrench to turn the nut beneath the bowl in controlled increments.
- Tighten bolts alternately in quarter-turn increments to distribute pressure evenly.
- Stop tightening as soon as the tank feels stable, level, and no longer wobbles.
Mastering grip and torque control guarantees a secure seal without risking damage.
Step-by-Step Guide to Tightening Bolts
Before you start tightening those bolts, make sure to shut off the water supply and drain the tank. This step is super important to avoid any leaks later on.
Once that’s done, you can hold the bolt head steady inside the tank.
Now, when you tighten the nut underneath, try to use short, alternating turns on each side. This way, you’ll ensure even pressure all around.
It’s a simple trick that helps prevent any cracking or leaks as you secure the tank firmly in place. Easy, right?
For the best results, use height-adjustable bolts to accommodate varying flange depths and create a more secure fit.
Preparing Bolts Properly
When preparing the toilet tank bolts, start by shutting off the water supply and draining the tank and bowl completely. This prevents water spillage and guarantees a clear working area.
Next, follow these steps to prepare the bolts properly:
- Inspect the bolts and washers for damage or corrosion; replace if necessary to guarantee a secure seal.
- Hand-thread each bolt through the tank holes, avoiding cross-threading to maintain integrity.
- Position rubber washers inside the tank to protect the porcelain and create a watertight seal.
- Hand-tighten the nuts onto the bolts just enough to hold the tank loosely in place without stressing the porcelain.
Proper preparation sets the foundation for effective tightening and prevents damage during installation. Using bolts made from solid brass or stainless steel can enhance corrosion resistance and durability in humid bathroom environments.
Tightening Techniques Explained
Begin tightening the toilet tank bolts by hand-snugging each nut evenly. Ensure the bolts hold the tank securely without forcing or stressing the porcelain.
Next, use a wrench to add a quarter-turn to each nut. Alternate between the left and right bolts to apply even pressure. After each increment, check the tank for any wobble or unevenness.
Continue tightening in small, controlled turns until the tank feels solid and level with no side-to-side movement. Avoid over-tightening, which can crack the porcelain or damage gaskets.
Firm resistance before porcelain strain signals the correct torque. Always hold the bolt head steady from inside the tank while turning the nut beneath.
Stop tightening immediately once the tank is stable and the seal is secure to prevent damage. Proper maintenance, including cleaning components like the fill valve seals, helps ensure the longevity and efficiency of your toilet.
How Tight Should Toilet Bolts Be?
You’ll want to snug the toilet tank bolts just enough to stop any wobbling without overdoing it. Over-tightening risks cracking the porcelain or damaging gaskets, so aim for firm, controlled pressure.
Start by hand-tightening both bolts. Then use a wrench for small increments, usually a quarter-turn at a time. Stop once the tank feels solid and level.
Begin by hand-tightening bolts, then carefully wrench in small quarter-turn increments until the tank is stable and level.
Follow these steps to achieve proper tightness:
- Hand-snug bolts initially to avoid cross-threading.
- Alternate tightening between bolts in small increments.
- Check stability and levelness after each adjustment.
- Cease tightening as soon as wobble stops and gaskets compress evenly.
This approach secures the tank firmly without risking damage or leaks. Ensuring the gasket sits flush with the tank surface is crucial for a leak-free seal and proper toilet function.
Tips for Even Tightening and Preventing Wobble
Making sure even tightening between the toilet tank bolts prevents uneven pressure that can cause wobble or stress on the porcelain.
Begin by hand-snugging both bolts to seat the tank evenly. Then, use a wrench to tighten each nut in small, alternating increments, typically a quarter-turn at a time. Switch from left to right.
This method balances pressure on the gasket and porcelain, reducing the risk of cracks or leaks. Keep the bolt heads steady inside the tank while you turn the nuts underneath to maintain alignment.
After each adjustment, check for side-to-side movement. Stop tightening as soon as the tank sits firmly and level.
Avoid over-tightening, which can cause stress fractures or distort seals. This balanced approach guarantees a stable, leak-free toilet tank assembly.
If leaks persist despite proper tightening, consider replacing gaskets and washers to ensure a secure seal.
Signs Your Toilet Bolts Are Tight Enough
Often, the clearest indicators that your toilet bolts are tight enough come from the tank’s stability and seal integrity.
You want to confirm the tank no longer rocks when nudged and sits level on the bowl. Additionally, the leak around the bolts should stop, and the gaskets must appear evenly compressed without twisting or pinching.
Check these signs to make certain proper tightness:
- The tank remains stable without side-to-side movement.
- You feel firm resistance before any porcelain strain.
- Gaskets are uniformly compressed, maintaining a secure seal.
- No water drips from the bolt areas during or after flushing.
When these criteria are met, your bolts are snug enough for reliable performance without risking damage. Regular inspections can help detect early signs of wear or leaks, much like routine checks for gasket seal integrity in bathtub maintenance.
Risks of Over-Tightening Toilet Bolts and Porcelain Damage
While tightening toilet tank bolts is necessary for stability and leak prevention, applying too much force can seriously damage the porcelain.
Porcelain is rigid and doesn’t flex under pressure, so over-tightening risks hairline cracks or fractures in the tank or bowl. Excess torque can also crush washers or gaskets, worsening leaks instead of fixing them.
Uneven tightening may tilt the tank, stressing the gasket and increasing the chance of leaks or damage. If you crank the bolts beyond a firm, snug fit, you risk costly repairs or full replacements.
To avoid this, tighten bolts in small, alternating increments and stop as soon as the tank sits solid and level without wobble. This prevents undue stress on the brittle china and guarantees a secure, leak-free seal.
Why You Should Tighten Toilet Bolts the Right Way?
Over-tightening toilet bolts can lead to costly damage, but tightening them properly guarantees a secure, stable tank that won’t leak or crack.
When you tighten toilet bolts the right way, you maintain the integrity of the porcelain and ensure a watertight seal.
Here’s why it matters:
- Prevent porcelain cracks by applying only firm, controlled torque. Stop once the tank is stable.
- Avoid uneven pressure that can tilt the tank and stress gaskets, causing leaks.
- Achieve a consistent seal by tightening bolts incrementally and alternating sides.
- Extend the life of washers and gaskets by not crushing them with excessive force.
Following this approach protects your toilet’s durability and prevents expensive repairs.
Common Mistakes to Avoid When Tightening Bolts
Because applying too much force can damage porcelain, you should never crank toilet tank bolts beyond a firm, snug fit. Avoid tightening one bolt fully before the other; instead, alternate turns to keep pressure even and prevent tilting.
Don’t skip draining the tank and shutting off the water supply; it’s essential for safe, effective tightening. Resist the urge to overtighten to stop minor wobbling quickly; use small increments, checking stability after each adjustment.
Also, don’t ignore the gasket’s condition; over-tightening can crush it, causing leaks. Finally, avoid using oversized wrenches that encourage excessive torque. Following these practices helps you secure the tank firmly without risking cracks, leaks, or uneven pressure that compromises the toilet’s function and longevity.
Frequently Asked Questions
How Often Should Toilet Tank Bolts Be Inspected or Replaced?
You should inspect toilet tank bolts every six months to catch early signs of corrosion, leaks, or loosening.
Replace them if you notice rust, stripped threads, or persistent leaks despite tightening.
Also, swap bolts during any major toilet maintenance or if the tank rocks despite proper tightening.
Regular checks prevent damage from over-tightening or failure, ensuring the tank remains stable and sealed.
This helps avoid risking porcelain cracks or costly repairs.
Can Different Bolt Materials Affect Tightening and Durability?
Yes, different bolt materials directly affect tightening and durability.
Metal bolts like stainless steel offer strong, corrosion-resistant fastening, allowing firm tightening without damage.
Plastic bolts require gentler tightening since they’re prone to stripping or cracking under torque.
Brass balances corrosion resistance and strength but may deform if over-tightened.
You should adjust your tightening approach based on bolt material. Use snug, controlled turns to prevent damage and guarantee long-lasting, leak-free seals.
What to Do if Bolts Are Rusted or Corroded Before Tightening?
If you spot rusted or corroded bolts before tightening, don’t just crank them down. You risk breaking them.
Instead, soak them with penetrating oil and let it sit to loosen corrosion.
Use a wire brush to clean off rust, then replace any severely damaged bolts with stainless steel ones for durability.
This approach guarantees secure fastening without cracking the porcelain or causing leaks, keeping your toilet tank stable and leak-free.
How to Identify if a Leaking Tank Bolt Needs Gasket Replacement?
You’ll know a leaking tank bolt needs a gasket replacement if water drips around the bolt area despite proper tightening.
Inspect the gasket for visible cracks, deformation, or compression that’s uneven or flattened.
If tightening the bolt doesn’t stop the leak, the gasket is likely worn out or damaged.
Replace it with a new gasket and re-tighten bolts carefully to restore a proper seal and eliminate leaks.
Are There Alternative Fastening Options Besides Standard Tank Bolts?
You might consider some “creative connectors” beyond the usual tank bolts.
Alternatives include stainless steel bolts with rubber washers for better corrosion resistance and sealing, or even quick-release clamps that simplify maintenance.
Some professionals use brass bolts to reduce rust and improve durability.
Just remember, any alternative fastening must maintain a secure, wobble-free fit without stressing the porcelain.
Always prioritize even pressure and proper gasket compression to avoid leaks or damage.
How Tight Should Toilet Tank Bolts Be? Final Tips
Tightening your toilet bolts isn’t about brute force; it’s about balance. Too loose, and you risk leaks and wobble; too tight, and you crack porcelain or strip threads.
You want a snug fit that holds firm without stress. Think of it like tuning a guitar string: not too slack, not too tight.
By tightening bolts the right way, you guarantee stability and avoid costly damage. This makes your toilet both secure and durable.