
Last Updated on July 23, 2023
Installing a pedestal sump pump keeps your basement dry and protects your home from flooding. It is an efficient and reliable pump for protecting your basement from water damage. Pedestal sump pumps are cheaper and easier to maintain than most other ones.
It is important to attach the check valve and take precise measurements carefully. Attach an adapter to your pipe before testing it with a pump and float.
Once that’s complete, drill in a weep hole for desired results, cut your pipe as needed, and don’t forget to secure an electric cord. Test out everything before adding on a cover plate.
Before installing, disconnect power lines, check the distance and heights of outlets, use a dedicated circuit, never use an extension cord, and don’t run the pump dry. With these tips, you should have no trouble installing your new pedestal sump pump.
Here we will provide complete instructions on safely and effectively installing a pedestal sump pump.
How to Install Pedestal Sump Pump: Complete Instructions
A pedestal sump pump is an important component of any home’s flooding defense system. Installing a new sump pump, or replacing an old one, can be done in a few simple steps with the right tools and materials. This guide provides an overview of properly installing a pedestal pump in a residential environment.
Tools You need for installation:
- Drill w 3/16″ bit
- bucket or garden hose
- shop vac (optional)
- Water
- Primer for better adhere
- PVC cement
- Hacksaw
- adjustable Pliers
- Rubber Boot
- adjustable pipe wrench
- zip ties
- gloves
- Screwdriver
- Utility knife
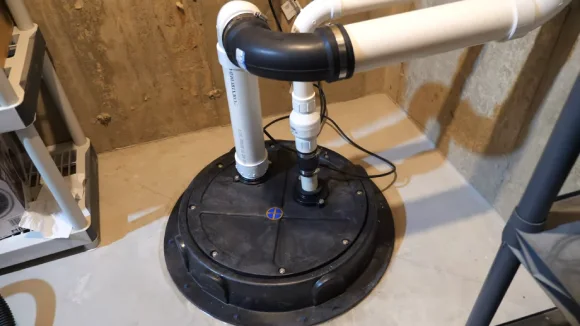
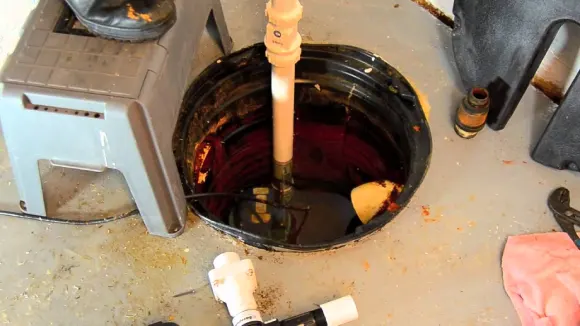
Step 1: Attach Check Valve:
To install a check valve, the first step is to prime the fitting and pipe with a primer. PVC cement should be applied to the inside of the fitting. Then, push the coupling onto the pipe and turn it to lock it in place. Finally, attach the check valve to the coupling.
Step 2: Take Measurements of the Check Valve:
It is important to take measurements throughout the installation process, including measuring the distance between the bottom of the check valve and base and from floor to pump. Additionally, measure any remaining piping that may be necessary.
Step 3: Attach Adapter to PVC Pipe:
To attach an adapter to the PVC pipe, prime and glue the male threaded adapter onto the pipe. Then thread the adapter into the pump for a secure fit.
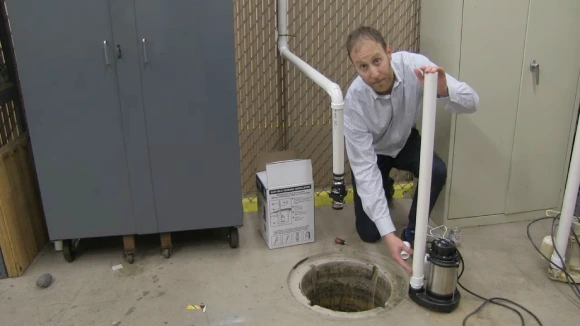
Step 4: Test Pump and Float:
After ensuring the secure attachment of all parts, plug the pump into the float control for testing purposes. This will confirm if the pump is working correctly and ensure the float switch’s correct operation.
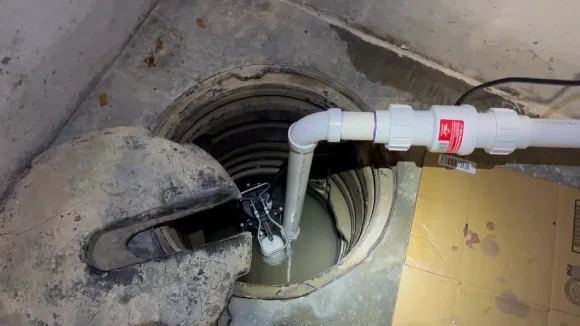
Step 5: Drill Weep Hole:
To prevent water build-up in the sump pump basin, drill a weep hole at a 45-degree angle, approximately two fingers up from the sump pump base plate. This will allow any excess water to drain away quickly and safely.
Step 6: Drop Pump into Fit:
Lower the sump pump down into the sump pit with the discharge pipe attached properly aligned with the check valve bottom. Once in place, secure any additional components or fasteners necessary for installation completion.
Step 7: Measure and Cut the Pipe:
To install a pedestal sump pump, measure the length of the pipe that will connect to the check valve and then cut it to size using a saw or pipe cutter. Once cut, place the adapter on the check valve bottom and ensure it is fitted securely.
Step 8: Attach Pipe to Check Valve:
Use a coupler and primer glue to attach the adapter to the bottom of the valve. Secure and tighten all components firmly, ensuring the float can move within its designated area.
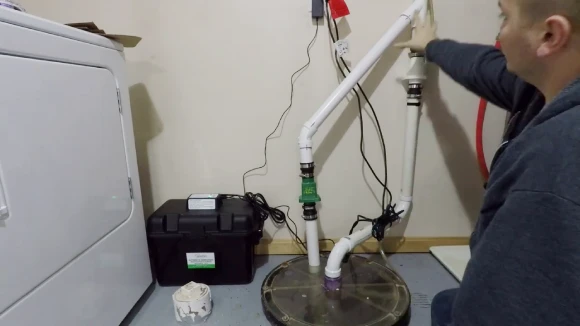
Step 9: Secure Electric Cord:
Connecting an electric cord to your sump pump is essential for operating it. Attach one end of an electrical cord securely to your discharge pipe, and then plug in your pump into an outlet for a power source.
Step 10: Test The System and Put Cover:
You are now ready for testing. Examine water flow through your check valve before finally placing a cover over your sump pump for protection from debris or other unwanted objects.
How to Remove the Existing Pedestal Sump Pump to Install a New One?
Removing a pedestal sump pump can be an intimidating task for the untrained homeowner. This guide will walk you through the steps of properly removing the sump pump and offer helpful tips along the way.
Step 1: Disconnect Power:
Disconnect power from the pedestal sump pump by unplugging the power cord from the wall outlet. Make sure to turn off the circuit breaker or switch in your home’s electrical panel to ensure that no electricity is flowing to the appliance.
Step 2: Disconnect Check Valve with Screwdriver:
Disconnect the check valve on the discharge pipe connected to the sump pump with a screwdriver. Use caution when handling this component as it can be sharp and contain sediment buildup. Be aware of any water that may leak out during this process.
Step 3: Remove the Old Valve:
Carefully remove the old valve from its mounting bracket. If necessary, use a wrench or pliers to loosen its bolts. Dispose of it properly per local regulations and safety guidelines.
Step 4: Clean Out the Pit:
Clean out any debris or sediment inside the sump pit before installing a new valve or pump. Use a hose and bucket to clear out dirt, rocks, and other obstructions from within the basin. Remove any organic material, such as leaves and sticks, with a rake or broom if needed.
What To Know Before Installing Pedestal Sump Pump?
Pedestal sump pump installation requires understanding safety precautions and best practices. By following these guidelines carefully, you can ensure the safe installation of your sump pump.
1. Disconnect the Power Line:
Before beginning the installation process, it is essential to disconnect all power sources to the area in which the installation will take place. This includes turning off electrical breakers or unplugging cords from any sockets within reach during installation.
Ensure no other electrical connections may be affected by installing a sump pump in the designated location.
2. Check the Distance and Height of the Outlet:
It is important to consider both the distance and height of an outlet location relative to its surroundings. The ideal outlet should be at least 6 feet away from any pooling water on ground level. It avoids short-circuiting issues due to water getting into the outlet connection area.
Outlets should never be installed lower than 18 inches from ground level as this could pose a risk of electric shock if moisture comes into contact with exposed wiring elements.
3. Never Use Extension Cord:
Never use an extension cord to connect a pedestal sump pump since this could lead to overheating and potential fires due to high current levels. It could overload or damage other electrical components connected downline, such as appliances or devices connected within your home’s electrical system.
4. Use a Dedicated Circuit:
Always use a dedicated circuit when installing a pedestal sump pump so as not to disrupt current flow across multiple outlets or devices within your home’s electrical system. This could cause trouble with other appliances and potentially damage expensive electronics.
5. Don’t Remove Tags:
Pedestal sump pumps come with several labels and tags indicating important safety information about their operation, including voltage ratings and maximum amps supported by each unit. Never remove these labels for any reason.
Doing so could void manufacturer warranties and leave you vulnerable in instances when repairs are needed. It can be harder to service it due to a lack of proof of purchase information on file for warranty purposes.
6. Don’t Run Pump Dry:
After completing all necessary installation steps, always ensure enough water is present before starting up your pedestal sump pump. Running dry can cause serious damage both internally within the motor casing as well as externally.
It increases wear on seals and hoses leading into/out of its housing unit. It needs costly repairs that would have otherwise been avoided had proper caution been taken before initial startup operations.
Is it Better for a Pedestal Sump Pump to Run Continuously?
A pedestal sump pump should not run continuously. Excessive use can decrease the motor’s lifespan and lead to premature failure.
Why is a Pedestal Sump Pump better than a Submersible Pump?
A pedestal sump pump has several advantages over a submersible pump. It has a longer lifespan, up to 5 times longer than a submersible pump. It is also generally cheaper than a submersible pump and easier to maintain.
Because the motor is mounted above the sump pit, repairs are typically easier to perform on this type of pump. Moreover, it can handle larger solids and debris without clogging.
How to Buy a Good Pedestal Sump Pump for Installation?
We have extensively reviewed the best rated pedestal sump pump for your needs to make selection easier. From there, we took the top features for your pedestal sump pump from the review, including horsepower, gallons per hour, base and column material, and adjustable float switch.
The amount of horsepower determines the power of the motor used in the pump unit. Look for a model with no less than 1/3 HP if you want to drain a large area quickly.
The gallons per hour (GPH) capacity indicates how much water can be moved by the pump in an hour. Look for models with ratings of at least 2,000 GPH when shopping around.
The material used in constructing the base and column should be considered when installing a sump pump. Cast iron is typically the most durable and corrosion-resistant, but plastic can also be used in certain applications.
Some pumps have an adjustable float switch that controls when the motor turns on and off. It helps reduce strain on the unit by preventing it from running unnecessarily while still achieving optimal performance levels.
Should You Drill Holes in a Pedestal Sump Pump Pit?
Drilling holes in the sump pump basin may be beneficial as it allows water to enter the basin more easily and activate the float switch. It helps prevent gas buildup, which could create other problems.
If you do decide to drill holes in your sump pit, you should consult with a professional first, as there may be structural issues that need addressing before doing so.
Who is the Best Person to Install a Pedestal Sump Pump?
A professional plumber is usually the best option for installation. They have experience in dealing with these types of systems and understand how necessary components interact.
Having a professional install your pedestal sump pump will help ensure everything is installed correctly, preventing costly repairs or replacements in the long run.
Install a Pedestal Sump Pump to Protect Your Home from Water Damage
Installing a pedestal sump pump protects your home from water damage and flooding. Before you begin the installation process, make sure you disconnect the power line, check the distance, don’t use an extension cord, and use a dedicated circuit.
From attaching the check valve to testing the system, these comprehensive instructions will help you install a pedestal sump pump successfully. Don’t forget to keep tags attached and ensure not to run the pump dry during testing.

