Last Updated on May 18, 2023
There’s nothing more comforting and rejuvenating than indulging in a hot, steamy shower after a demanding day at work. But low water pressure can make this simple pleasure inconvenient, potentially dampening your relaxation time.
The culprit in such situations could be the water flow restrictor installed in your Delta shower head to conserve water. This water flow restrictor is a small component designed to save water, but sometimes it can hinder your showering experience.
By simply removing the showerhead, extracting the rubber grommet, removing the water restrictor, and reinstalling the grommet and showerhead, you can transform your shower experience.
In this detailed article, we will guide you step-by-step on removing the water restrictor from your Delta shower head to improve the water pressure in your shower. So, grab your essential tools, and let’s get started.
How to Remove Water Restrictor From Delta Shower Head: Easy Steps
The Delta showerhead is popular among homeowners because of its sleek design, functionality, and water efficiency. Still, there may come a time when removing the Delta shower head water restrictor can significantly improve your shower experience.
Here is a step-by-step guide on how to do so:
STEP 1. Turn Off the Water Supply
Before you begin working on the showerhead, turning off the water supply safely is crucial. Locate the water shutoff valves in your home. They are generally found near the water heater, in the basement, or a utility closet. There may be two valves, one for hot water and another for cold water.
Turn both valves clockwise to shut off the water supply. If the valves are stiff or difficult to turn, you may need a wrench or pliers for extra leverage. Make sure to turn the valves gently and gradually to avoid damaging them.
Test the water flow by turning on the shower to confirm that the water supply has been completely turned off. This will help prevent accidental water spillage or damage while working on the showerhead.
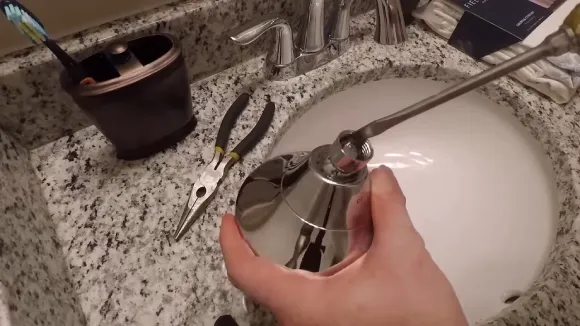
STEP 2. Remove the Showerhead
Inspect the showerhead to identify how it connects to the shower arm. Some models use a threaded connection, while others have a ball joint.
If the showerhead uses a threaded connection, gently grip the base of the showerhead with your hand or non-abrasive cloth to prevent scratching the finish. Turn the showerhead counterclockwise until it unscrews from the shower arm.
For showerheads with a ball joint attachment, locate the retaining nut connecting the showerhead to the arm. Use an adjustable wrench to gently loosen and unscrew the retaining nut to separate the showerhead from the arm.
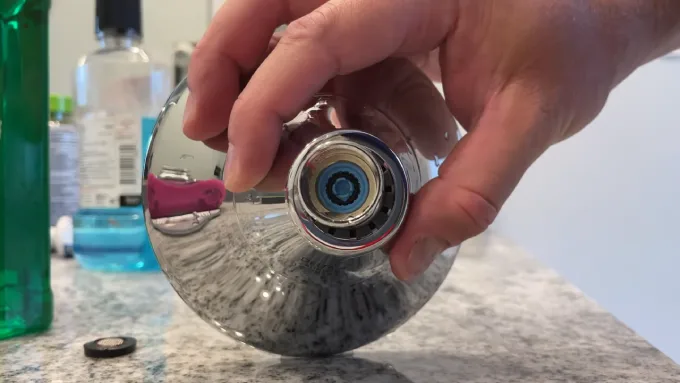
STEP 3. Extract the Rubber Grommet
After removing the showerhead, examine the inside for the rubber grommet. This is a small, typically black or gray rubber ring that sits in the water inlet of the showerhead.
Use needle-nose pliers or tweezers to grab hold of the rubber grommet carefully. Avoid puncturing or damaging the rubber, which may cause water leaks when the showerhead is reassembled.
Carefully pull the rubber grommet out of the shower head, making sure not to lose it, as it will need to be replaced once the water restrictor is removed.
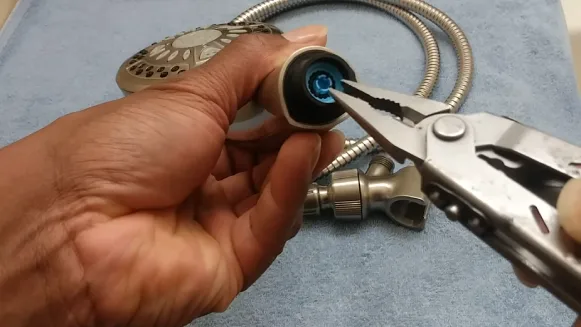
STEP 4. Remove the Water Restrictor

With the rubber grommet removed, locate the water Restrictor inside the showerhead. It will appear as a small plastic or metal piece with a central or side hole.
Use a flat-head screwdriver, needle-nose pliers, or another appropriate tool to pry the restrictor out of the showerhead carefully. Be cautious not to damage the restrictor if it must be reused or the interior surface of the showerhead if you are planning to install a new restrictor.
Clean any debris or mineral buildup from the area where it was seated in the shower head after removing the water restrictor. This will ensure proper functioning and water flow after replacing or reinstalling the restrictor.
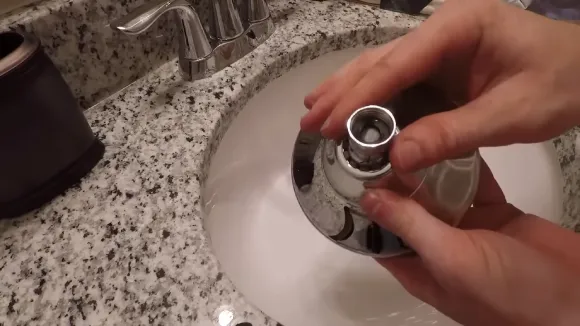
STEP 5. Reinstall the Rubber Grommet
Once you have successfully removed the restrictor, it is essential to reinstall the rubber grommet, which functions as a seal to prevent water leakage. Carefully place the rubber grommet back into its original position within the showerhead.
Ensure it sits securely and flat against the inner surface, covering all the small gaps and edges. This is crucial in maintaining an efficient and leak-free shower head.
STEP 6. Reinstall the Showerhead
Now that the rubber grommet is in place, the next step is to reattach the showerhead to the shower arm. Hold the shower head firmly and align the thread of the shower arm with the opening at the bottom of the showerhead.
Turn the showerhead clockwise, screwing it onto the shower arm. Ensure the fit is tight and secure. Do not overtighten, as this may damage the threads or cause unnecessary stress on the shower arm.
After fitting the showerhead back onto the shower arm, wrap Teflon tape around the threaded part of the arm to create a watertight seal. This prevents water leaks and ensures a secure connection between the showerhead and the arm.
STEP 7. Check the Water Flow
Finally, it’s time to turn your water supply back on and test your showerhead. Turn on the water slowly, allowing the flow to increase gradually. This will help you observe whether removing the water restrictor has improved the flow rate in your shower system.
Check for leaks around the showerhead and arm connection as you feel the increased water flow. If you notice any leaks, turn off the water supply and attempt to further tighten the connection between the showerhead and arm.
What Does a Delta Shower Head Water Restrictor Look Like?

A Delta shower head water restrictor is typically an easily accessible, round-shaped object within the fixture. The color of the restrictor is often blue or green. It features adjustable metal clamps to increase or decrease water pressure depending on the user’s preference.
Also, it includes a rubber gasket between the restrictor and the shower head to ensure a watertight seal and prevent leaking.
How Do I Know If My Delta Shower Head Has a Water Restrictor?
To determine if your Delta showerhead is equipped with a water restrictor, you can perform the following steps:
#1 Detach the showerhead: Begin by carefully unscrewing the showerhead from the shower arm, using a wrench and a protective cloth to avoid damaging the showerhead’s finish.
#2 Inspect the showerhead: Look for a small, circular, disc-shaped component with a hole in the center, typically behind the screen or filter. This component is the water restrictor. The restrictor may be made of plastic, white, or light blue in many Delta shower heads.
#3 Read the showerhead Description: If you cannot locate the restrictor through a visual inspection, consult the showerhead’s packaging, user manual, or product description. Information regarding a built-in water restrictor should be available in these materials.
#4 Contact Delta customer support: Reach out to Delta’s customer support team for guidance if you’re still unsure about the presence of a water restrictor in your shower head. They can provide the necessary information based on the showerhead’s model number.
Precautions to Take Before Removing the Water Restrictor From a Delta Shower Head

You must handle tools carefully to remove the water restrictor from a Delta shower head while taking safety precautions to ensure nothing gets damaged. Here are some safety precautions to consider:
Turn Off the Water Supply
A fundamental precautionary measure before attempting to remove a water restrictor from a Delta handheld shower head is to shut off all the valves of its water supply.
Turning off the main valve at first will help stop the flow of cold and hot water from your shower head, reducing any chances of plumbing system damage or injuries due to electricity or scalding.
If you are unsure how to turn off valves for your plumbing system, then it is advised to take professional help for this job.
Use Proper Tools for Removing
Using proper tools that can be used for removing Delta shower heads’ water restrictors is recommended by professionals. It is best to use pliers, adjustable wrenches, screwdrivers, and other tools to ensure they suit your plumbing system perfectly.
Also, quality tools can better grip those slippery screws and nuts so you don’t slip up while removing them.
Inspect the Shower Head Carefully
Before you begin with actually removing the restrictor, inspect your Delta shower head thoroughly to ascertain if it has suffered any damage or leakage due to wear & tear over time.
If yes, immediately contact a professional maintenance specialist who can fix it without causing any further issues in your plumbing system. Also, inspect other parts of your shower, like pipes and faucets, and check if their seals are intact.
Must Test the Water Pressure
Testing the pressure of warm and cold water after removal is paramount. This helps you find out whether everything went smoothly during installation or not. If there’s no significant change in pressure compared to before the removal process, then probably everything was fine.
What Happens If I Remove the Water Restrictor From my Delta Shower Head?
Removing a Delta handheld shower head water restrictor can cause an increase in water pressure in your shower system since it regulates the rate at which hot and cold water flows into your showerhead.
This could have potential safety hazards, like scalding from hot water if someone is not expecting it, as well as potential leakage due to the increased pressure. Also, removing this device may cause costly damage to your pipes if you use too much pressure for them to handle.
Is it OK to Remove the Water Restrictor From the Delta shower head?
While some people may remove their Delta shower head water flow restrictor for various reasons, it is typically not recommended. This is because it can create potential safety issues, such as scalding from hot water or damage to your plumbing system due to too much pressure in your pipes.
Furthermore, you may void your manufacturer’s warranty by removing this device, as it is usually installed by certified professionals and not meant for DIY removal or repair.
Does Removing Delta Shower Head Water Restrictor Increase Pressure?
Removing the water control valve from the Delta showerhead can potentially increase water pressure. The primary function of a water restrictor is to control and maintain a consistent water flow rate, which often leads to a reduction in water pressure.
Eliminating the water restrictor may indeed result in increased water pressure. But, it is essential to be aware of the potential risks associated with doing so, as the increased water pressure can cause problems for your showerhead and plumbing system.
Can Removing the Water Restrictor Cause Any Damage to the Delta Shower Head or Plumbing System?
Removing the water flow controller from your Delta shower head can have several adverse effects that may lead to damage. Some of these negative consequences include:
Water Hammer: Removing the water restrictor can cause a water hammer, which occurs when a pressure wave travels through your pipes, creating loud banging noises. Water hammers can damage your pipes, joints, or valves over time, leading to leaks and costly repairs.
Reduced Lifespan: The increased pressure from removing the restrictor can strain your showerhead and plumbing system. This added stress could cause showerhead and plumbing system components to wear out more quickly, reducing lifespan.
Reduced Efficiency: Water restrictors are designed to conserve water through their flow rate control function. By removing the restrictor, you may unnecessarily wastewater, increasing your water consumption and utility bills.
Increased Water Pressure: Although removing the water restrictor can increase water pressure, it can also lead to inconsistent water flow, making it difficult to maintain a comfortable showering experience.
Improve Showering Experience by Removing Delta Shower Head Water Restrictors
Removing the water or flow restrictor from the Delta shower head can be tricky, but our guide should have made the process simple and straightforward. By following the steps outlined in this guide, you’ve successfully removed the water restrictor from your Delta shower head.
Remember, maintaining your shower head is essential for its longevity and personal hygiene, so don’t hesitate to refer back to this guide if you need any reminders.
We hope this tutorial made things easier for you and helped improve your daily showers. Now, go ahead and pamper yourself in your newly improved shower.

