Last Updated on April 3, 2023
You’re trying to take a bath, but the tub spout is leaking, and you can’t seem to get it off. A leaky tub spout is annoying enough, but when you can’t seem to remove it, it’s even worse.
In some cases, the set screws that hold tub spouts in place can become stripped if they are old or used a lot. This makes it difficult (if not impossible) to remove the tub spout without causing damage.
Whenever you find yourself in this situation, don’t worry, we have a solution to assist you. With our easy-to-follow guide, you’ll be able to take off your tub spout without difficulty. Keep reading to learn how to remove the tub spout without set screws.
How to Remove Tub Spout without Set Screw : 3 Methods
Different methods can be used to remove your tub spout, and it largely depends on what type of tub spout you have. The most commonly used tub spout is the screw-on type, which is attached to the wall with a set screw. If you have this bathtub spout, it is necessary to remove the set screw to take the spout off.
If your tub spout does not have a set screw, it is likely either push-on or slip-on. Push-on and slip-on tub spouts are not anchored to the wall so that they can be removed without any tools.
You may encounter a situation where you have a tub spout without a set screw, or the set screw is damaged, and you can’t remove it. In this case, we have a few different solutions for you.
Solution 1: Use a Putty Knife or Screwdriver
If the end of your tub spout is flush with the wall, you can try using screwdrivers or putty knives to help remove it. Here are the steps:
Step 1: Locate the Seam
Before you begin, look at your bathtub’s spout. If it’s level with the wall, then you may be able to remove it without too much trouble. Locate the seam where the spout meets the wall. This is usually where any set screws are located.
Step 2: Insert the Tool
Carefully insert the putty knife or screwdriver into the seam. If you can’t see a set screw, apply some pressure to loosen the spout. Be careful not to damage the wall or fixtures as you work. It may help to use a screwdriver with a curved tip.
Step 3: Twist and Pull
Once you’ve loosened the spout, twist it and pull it away from the wall. If there’s a set screw, use your tool to remove it before pulling off the spout. Once the spout is removed, you can check for any damage and make repairs as necessary. With a bit of patience, you should be able to tackle this task with little difficulty.
Solution 2: Use an Adjustable Wrench and Rag

If the first solution does not work, you might want to try using an adjustable wrench. Using a rag when using the wrench is essential to avoid damaging the finish of your tub spout. Here’s how to do it:
Step 1: Shut Off the Water
Before beginning any work on your plumbing, it is essentially turning off the water. This will prevent any accidental flooding and make removing the tub spout easier. There are usually two valves near the tub: a hot water valve and a cold water valve. Be sure to turn both valves clockwise to disconnect the water supply.
Step 2: Remove Tub Spout
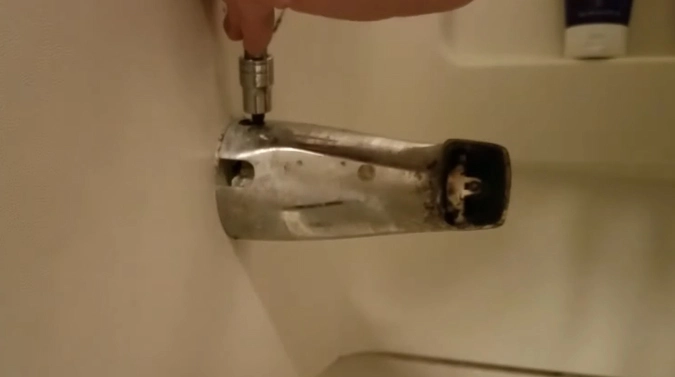
In the absence of a set screw, your tub spout is most likely attached with a retaining nut. When removing the tub spout, start by placing a rag over the end of the spout. This will protect the finish from scratches as you work. Then, use an adjustable wrench to loosen and remove the retaining nut. Once the nut is removed, it should be possible to pull the spout directly off the pipe. If the spout is stuck, you may have to use a pair of pliers to help pry it loose.
Step 3: Check for Damage
Once the tub spout is removed, inspect it for any damage. If the spout is cracked or broken, you will need to replace it. In some cases, it may be possible to repair the damage with a sealant or epoxy. Once you’ve inspected the tub spout, you can reattach it or replace it as necessary.
Solution 3: Use a Hacksaw
If the first two solutions fail, use a hacksaw to take out the tub spout. This is a more extreme solution and should only be used as a last resort. The following steps will guide you:
Step 1: Select a Fine-Toothed Hacksaw
First, make sure that you have a hacksaw with a fine-toothed blade. This will give you the most control and minimize the risk of damage to your tub. Next, locate the set screw on the back of the spout. If you can’t see it, try to feel for it with your fingers. It may be hidden behind a small cap or plate.
Step 2: Insert the Blade into the Spout
Carefully insert the blade of the hacksaw into the spout opening. Make sure you are lined up with the set screw and then start sawing through it. It may take several attempts to get through the screw, so be patient and take your time.
Step 3: Remove the Spout
Once the set screw has been cut through, the spout can be removed from the tub. Be careful, as the spout’s back may be sharp from where you were sawing. If necessary, use a file or sandpaper to smooth out any rough edges. It’s also a good idea to apply some plumber’s putty or silicone caulk around the base of the spout to prevent any water leaks.
With patience and the right tools, removing your tub spout should be straightforward. If you’re having trouble, don’t hesitate to ask a friend or family member for help. It’s always better to be safe than sorry when working with plumbing.
FAQs
How are Tub Spouts Attached?

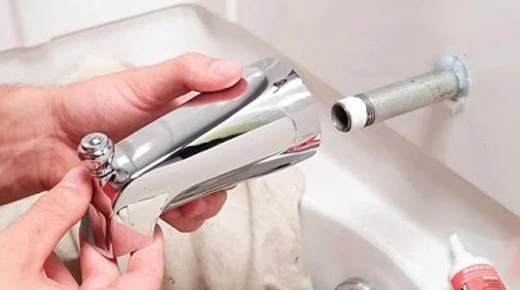
Most tub spouts are fitted to the wall via a threaded nipple connected to a supply pipe. The supply pipe is usually located behind the wall, and the threaded nipple extends through a hole in the wall. Tub spouts are then attached to the threaded nipple, and a washer and nut are used to secure it in place.
Occasionally, the entire assembly (supply pipe, threaded nipple, and tub spout) may be one piece fixed to the wall.
Are All Tub Spouts The Same?
No, not all tub spouts are the same. There are many different types of tub spouts available on the market, each with its own unique advantages and disadvantages. For instance, some tub spouts are compatible with specific types of showerheads, while others are more universal in their design.
Also, some tub spouts come with built-in diverters that allow you to easily switch between the shower and the tub, while others do not.
How Do I Know If My Tub Spout is Slip Fit?
There are a few ways to tell if your spout fits snugly in the tub. One is to look at the connection between the spout and the wall. If there is a gap between the two, then it is likely that your faucet is slip-fit.
Another way to tell is by attempting to remove the spout. If it pulls off quickly, it is most likely a slip fit. Finally, you can consult your product manual or contact the manufacturer to be sure.
But generally, if your spout has a smooth connection with the wall and does not require any screws or bolts for installation, it is likely to slip fit.
What is A Tub Spout Diverter?
An end diverter is a device installed on the end of a bathtub faucet. It diverts water from the spout to a shower head, which allows the user to take a shower without having to turn off the water at the tub faucet. Tub spout diverters are available in various styles and finishes, and a qualified plumber or handyman can install them.
Final Thoughts
If you need to remove your tub spout, there are a few different ways you can do it. The best method will depend on the type of spout you have and the available tools.
In most cases, it is possible to remove the spout without too much difficulty. In any case, if you’re still having trouble, you may need to call a professional plumber for assistance.
We hope this article on how to remove tub spout without a set screw was helpful. If you have any questions or comments, please feel free to leave them below. Thanks for reading.

