Last Updated on August 1, 2023
Have you ever experienced low water pressure in your home or noticed your well pump’s pressure gauge malfunctioning? If these problems sound familiar, consider changing your well pump’s pressure gauge. Maintaining and replacing the pressure gauge regularly is essential to ensure your water system functions correctly.
Although changing the pressure gauge might seem complicated, it’s relatively straightforward if done with caution and care. To change a well pump pressure gauge, prioritize safety by turning off the power to the well pump.
Now drain the full water system by opening the faucet at the lowest point in your house. Then, prepare the replacement pressure gauge, remove the old gauge, and install the new one.
Today we will guide you through the step-by-step process of changing a pressure gauge on a well pump. So, read along and discover how easy it is to change a water pressure gauge.
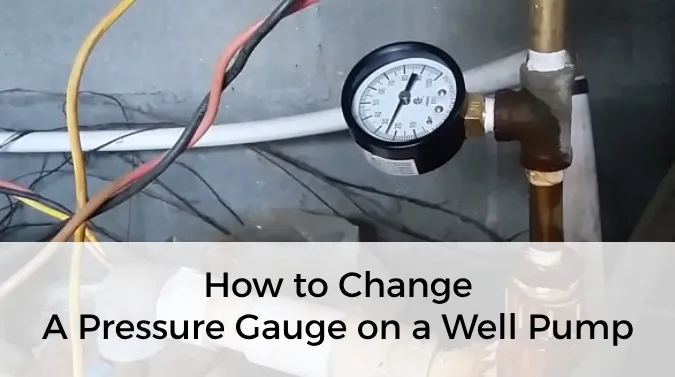
How to Change a Pressure Gauge on a Well Pump: A Step-by-Step Guide
Changing a well pump water pressure gauge may seem daunting initially, but it can be a breeze with the right steps and approach. To change a water pressure gauge on a well pump, follow this step-by-step guide:
- Step 1: Safety first
- Step 2: Drain the full water system
- Step 3: Prepare the replacement pressure gauge
- Step 4: Remove the old gauge
- Step 5: Install the new gauge
- Step 6: Test and power up the water pump
Let’s discuss these steps in detail.
Step 1: Safety First
Before changing the pressure gauge on your well pump, prioritize your safety by turning off the power supply to avoid any potential electric shocks. Imagine the power supply as a dangerous current flowing through the system, and by switching it off, you are creating a shield of protection for yourself.
| Safety Tips | Explanation |
| Locate the circuit breaker or fuse | The circuit breaker or fuse controls the electrical power to the well pump. Find it and switch it off to cut off the power supply. |
| Prevent electric shocks | Switching off the power supply is crucial to avoid any potential electric shocks while working on the well pump system. |
| Use caution while working | Always prioritize safety and exercise caution while dealing with the well pump system. |
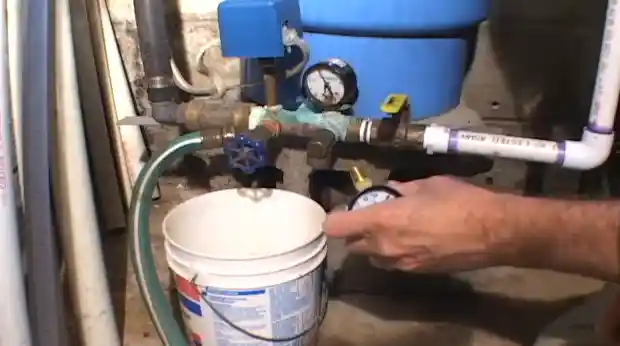
Step 2: Drain the Full Water System
Before you start your replacement project, locate the drain spigot on the pressure tank or use a garden hose if there’s no floor drain. Make sure it is easily accessible and not obstructed.
Now turn off the power supply to the well pump to prevent accidental activation during draining. This ensures your safety and avoids any potential damage to the pump.
Also, you need to open the drain spigot or attach the garden hose to the pressure tank. Position the other end of the hose or spigot outside your home, ensuring water flows smoothly away from the house foundation.
Slowly open the drain valve, allowing the water to flow out of the system. Monitor the water flow and ensure it continues smoothly until the system is completely drained.
Step 3: Prepare the Replacement Pressure Gauge
To properly prepare the replacement pressure gauge and ensure a leak-free installation, clean the male threads on the gauge, ensuring they are free from debris or old tape.
Now, wrap the Teflon tape clockwise around the threads, providing a tight and secure seal. Make sure the tape covers the entire length of the threads, overlapping each layer slightly.
You should also apply sufficient pressure while wrapping to create a snug fit. Once the tape is wrapped, use your fingers to press it into the threads, ensuring it adheres properly.
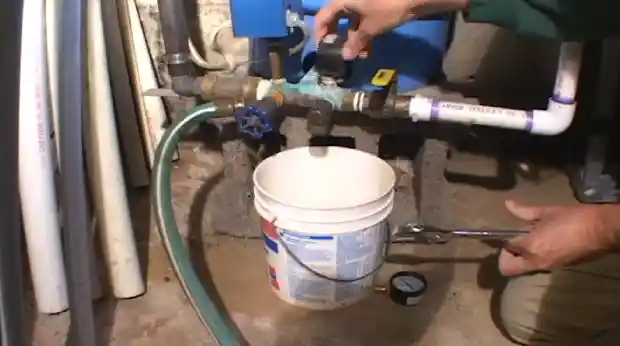
Step 4: Remove the Old Gauge
Now, grab your channel locks or plumber pliers and firmly grip the square brass fitting below the old gauge dial. It’s time to remove it from the pressure tank manifold. Make sure to turn the old gauge counterclockwise to unscrew it completely. Be careful not to damage the square brass fitting while doing this.
Once the old gauge is removed, take a moment to inspect it for any blockages or buildup. If you notice any, use a clean cloth or brush to clean the gauge gently. It is important to ensure the gauge is debris-free before installing the replacement.
Step 5: Install the New Gauge
After removing the old gauge you need to install a new gauge. To properly install the new gauge, insert the gauge into the female threads of the pressure tank manifold. Align the gauge properly and hand-tighten it in a clockwise direction. Once snug, use pliers to secure it firmly, ensuring the gauge is securely in place.
Step 6: Test and Power Up the Water Pump
Once you’ve securely installed the new pressure gauge, it’s time to unleash the power of your water system and watch as it surges to life like a mighty river. Close the drain spigot on the pressure tank to prevent water from escaping.
Now turn on the circuit breaker or replace the fuse to supply electricity to the water system. As you power up the pump, watch the pressure gauge closely. It should start to rise, indicating that the system is pressurizing.
Can a well pump pressure gauge go bad?

If you’re experiencing a pressure gauge failure on your well pump, it could be due to one or more of the following reasons:
1. Mechanical Vibration
Mechanical vibration can greatly affect the accuracy of a pressure gauge on a well pump. Understanding the potential impact of mechanical vibration on the gauge’s performance is crucial. Here are some key points to consider:
- Vibrations can cause the gauge’s internal components to shift, leading to inaccurate readings.
- Excessive vibration can damage the gauge’s delicate mechanisms, resulting in permanent failure.
- Mounting the gauge securely using vibration-damping materials can minimize the effect of mechanical vibration.
- Regular inspection and maintenance of the gauge can help identify any issues caused by vibration and ensure its proper functioning.
2. Pulsation
Now, let’s talk about pulsation and how it can impact your pressure gauge on the well pump, resulting in a real headache.
Pulsation refers to the regular variation in pressure within the system, causing fluctuations that can affect the accuracy and reliability of your pressure gauge. These fluctuations can arise from various factors, such as the pump’s operation, the design of the system, or even the presence of air in the water supply.
To better understand the impact of pulsation, let’s take a look at the following table:
| Factor | Impact on Pressure Gauge |
| Pump operation | Intense vibrations can damage the gauge, leading to inaccurate readings. |
| System design | Poorly designed systems can cause excessive pulsation, affecting gauge performance. |
| Air in water supply | Air pockets can cause erratic pressure variations, making it difficult for the gauge to provide accurate readings. |
To ensure the longevity and accuracy of your pressure gauge, it is important to address any issues related to pulsation. Consider consulting a professional to evaluate your system design, minimize vibrations, and eliminate air pockets from the water supply, ensuring the optimal performance of your pressure gauge.
3. Extreme Temperature
To maintain the accuracy and longevity of your pressure gauge, be aware of the impact extreme temperatures can have on its performance. Extreme temperatures can cause significant damage to the internal components of the gauge, leading to inaccurate readings and potential failure.
When exposed to high temperatures, the materials inside the gauge can expand, causing the internal mechanisms to become misaligned or even break. Conversely, extreme cold temperatures can cause the materials to contract, leading to similar issues.
Ensure that the pressure gauge is designed to withstand the specific temperature range it will operate. Also, proper insulation and protection should be implemented to shield the gauge from direct exposure to extreme temperatures.
4. Pressure spikes
Pressure spikes can occur when there is a sudden increase in water pressure within your well pump system. Various factors, such as a malfunctioning pressure switch, a faulty check valve, or a clogged pressure tank, can cause these spikes.
You must address pressure spikes promptly, as they can damage your well pump system’s pressure gauge and other components. To mitigate pressure spikes, you can install a pressure relief valve, automatically releasing excess pressure and protecting your pressure gauge from potential damage.
Also, regular maintenance and inspection of your well pump system can help identify and prevent pressure spikes before they occur.
5. Overpressure
Excessive pressure can wreak havoc on your system, causing potential damage and costly repairs. It is crucial to address overpressure issues promptly to prevent any further complications.
Here are three key points to consider when dealing with overpressure:
- Install a pressure relief valve: This valve automatically releases excessive pressure from the system, safeguarding it against potential damage.
- Monitor pressure levels: Regularly check the gauge to ensure it stays within the recommended range. If the pressure consistently exceeds the limit, it may indicate a problem with the pressure switch or other components.
- Adjust the pressure switch: If the pressure is consistently high, adjusting the pressure switch can help regulate the system’s pressure. Consult the manufacturer’s guidelines to ensure proper adjustment.
How do I know if my well pump pressure gauge is bad?
If your well pump pressure gauge is not showing any movement or giving a reading when there is no water in the system, it’s likely that the gauge is faulty and needs to be replaced.
A malfunctioning pressure gauge can hinder your ability to accurately assess the system’s performance. To determine if your well pump pressure gauge is bad, first check for any signs of physical damage, such as cracked glass or a loose needle.
Also, you can use a pressure test to compare the gauge’s reading with a known accurate pressure source. If the gauge consistently gives inaccurate readings or fails to move, it’s time to replace it with a new one to ensure accurate monitoring of your well system’s pressure.
What does it cost to replace a well pump’s pressure gauge?
Installing a new pressure gauge on your well system can cost anywhere from $100 to $175, ensuring accurate water pressure monitoring. When replacing a pressure gauge on a well pump, consider the cost and benefits it brings.
A malfunctioning pressure gauge can lead to inaccurate readings, affecting your well system’s overall performance and efficiency. By investing in a new pressure gauge, you can ensure precise measurements of your water pressure, allowing you to promptly detect any abnormalities or fluctuations.
Moreover, a well-maintained pressure gauge will contribute to the longevity of your good pump, preventing potential damages caused by excessive pressure or strain.
How do I change the PSI on my well pump?
To modify the PSI on your well pump, simply use a wrench to adjust the pressure settings, allowing for precise control over the water flow. Locate the pressure gauge on your well pump. It is usually attached near the pressure switch.
Now using a wrench, turn the nut clockwise to raise the pressure or counter-clockwise to reduce the pressure. The nut is typically found on top of the pressure switch.
Start by making small adjustments and then check the water pressure using a gauge. This will help you ensure that you achieve the desired PSI. Remember that increasing too much pressure can stress the well pump and plumbing system, while decreasing it too much may result in insufficient water flow.
What is the normal water pressure for a house with a well pump?
The right water pressure in your home is essential for a well-functioning plumbing system and a satisfying shower experience. Regarding houses with well pumps, the normal water pressure should fall between 40 and 60 psi (pounds per square inch).
This range ensures a steady water flow throughout the house without any disruptions. Pressure below 40 psi may result in weak water flow, while pressure above 60 psi can cause damage to pipes and appliances.
You can use a gauge typically installed near the pressure switch on your well pump system to check your water pressure. This gauge measures the pressure in your water system and helps you determine if it falls within the normal range.
How long does a water pressure gauge last on a well pump?
If you’ve been diligent with maintenance, you may witness the water pressure gauge on your well pump standing strong for up to 15 years, guiding you through the ebb and flow of your water system’s health.
The life expectancy of a water pressure gauge on a well pump typically falls within 10 to 15 years. However, some gauges may malfunction as early as three years, while others can continue functioning properly even after 20 years if regularly maintained.
Regular maintenance, such as checking for leaks, ensuring proper calibration, and promptly addressing any issues, can significantly extend the lifespan of the water pressure gauge.
Change the Pressure Gauge on a Well Pump to Keep Your System Running Smoothly
Maintaining and replacing your well pump’s pressure gauge is vital for ensuring your water system functions effectively. Although changing a pressure gauge might sound daunting, following the above steps can make the process more manageable.
Prioritizing safety, draining the water system, preparing the replacement gauge, removing the old gauge, installing the new gauge, and finally testing and powering up the water pump are the necessary steps that one needs to follow.
Changing a pressure gauge on a well pump is something that most homeowners can do themselves without the need for professional assistance. But, if you have doubts or do not feel confident undertaking this task, it is always advisable to seek professional help.

