Last Updated on June 26, 2023
There’s nothing worse than weak water pressure that makes it tough to wash dishes or take a shower. Alternatively, excessively high pressure can lead to concerns about potentially damaging your plumbing system. You’re definitely not the only one grappling with this predicament.
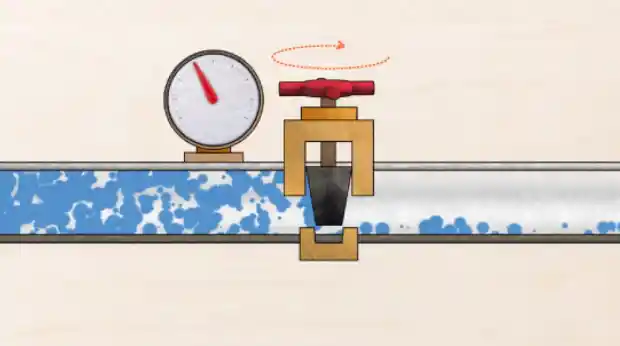
The good news is that you can fix these problems by adjusting your water pressure regulator. You can increase the pressure regulator valve by merely turning the pressure clockwise. Conversely, turning it counterclockwise will reduce the pressure to your desired level.
As homeowners, it’s also essential to know the right water pressure for your house, the PSI level your Well pressure tank should be set, and the signs if your water pressure regulator valve is bad. So, keep reading to discover the steps involved in pressure regulation on a Well for the perfect water flow.
How to Adjust Water Pressure Regulator on a Well: Easy Steps
You can easily adjust your Well pump’s water pressure regulator and ensure optimal water pressure for all tasks. Whether for cooking, cleaning, or watering your garden, this step-by-step guide will walk you through adjusting the water pressure regulator on a Well pump like a pro:
STEP 1. Locate the Water Supply Line
Locating your Well pump’s water supply line is fundamental to understanding and maintaining your household’s water distribution system. The water supply line is the primary conduit connecting the Well pump to your residence, ensuring that water is systematically dispersed throughout the home.
To identify this essential component, one must examine the Well pump system’s vicinity, typically within a designated pit, Well pump house, or underground structure. Upon inspection, the water supply line should be discernible as a robust, solid pipeline directly attached to the Well pump.
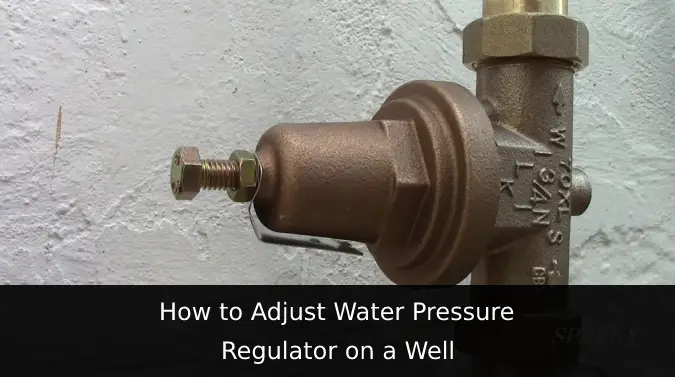
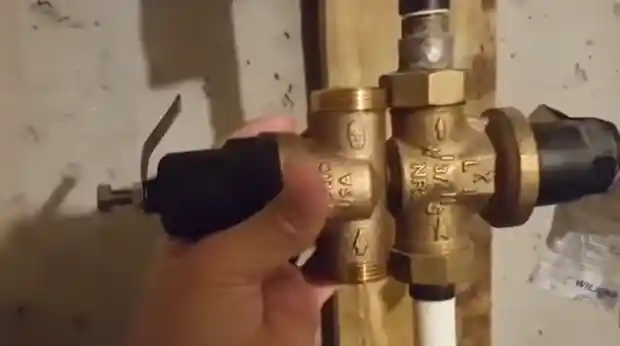
STEP 2. Locate the Pressure Regulator Valve
To successfully manage your home’s water pressure, it is essential to locate the pressure regulator valve, which plays a critical role in maintaining the balance of the system. The valve is typically connected to the water supply line, often near the Well pump or housed within an individual plumbing configuration.
When identifying the pressure regulator valve, watch for a bell-shaped or cylindrical component, possibly featuring a bolt and locknut on the top. You need to know the valve’s exact location to ensure optimal water pressure throughout your home and prevent damage caused by excessive pressure.
STEP 3. Turn Off the Power to the Well Pump
Safety first! Before making any adjustments, ensure that you turn off the electric supply to the Well pump to avoid any accidents or electrocution hazards. You can do this by switching off the circuit breaker that controls the Well pump system or unplugging the Well pump from its power source.
Double-check that the power is off by trying to turn on a faucet in your home. If no water flows, you’ve successfully turned off the electricity to the Well pump.
STEP 4. Check the Current Water Pressure
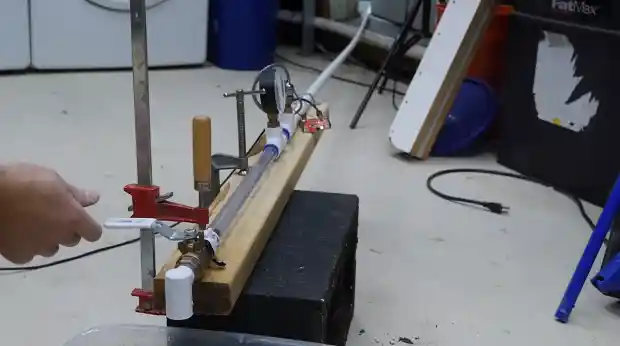
Before making any adjustments, it’s essential to determine your Well pump system’s current water pressure. To do this, attach a pressure gauge to a hose bib or an available tap, ensuring it’s connected securely.
Next, open the faucet and note the initial reading on the pressure gauge. This starting pressure reading will help you determine the adjustments needed on the pressure regulator valve.
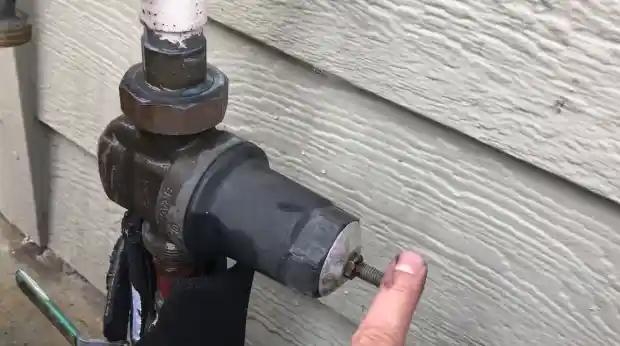
STEP 5. Adjust the Valve Screw
After ensuring the Well pump is switched off and the water is drained from the system, locate the valve screw on the pressure regulator. The valve screw is usually a small plastic or metal bolt located atop the regulator, which is found near the pressure gauge.
Using a wrench, turn the screw clockwise to increase water pressure or anticlockwise to decrease pressure. Make small adjustments (usually a quarter turn at a time), as significant changes can lead to issues such as water hammering or pipe damage.
Keep a close eye on the pressure gauge while making these adjustments to ensure they move in the desired direction.
STEP 6. Check the Water Pressure
Once you have made the necessary adjustments to the valve screw, it’s time to check the water pressure. You’ll need to open the faucet closest to the Well system to do this. Turn the water tap on and allow the water to run for a minute.
Doing this will release potential air trapped in the pipes and provide a more accurate pressure reading. Next, take a water pressure gauge reading at the faucet where the hose was connected to drain the water. If your adjustments were successful, the water pressure should now be within the desired range.
STEP 7. Turn on Power & Check the System
After successfully attaining the desired water pressure, it is crucial to turn the Well pump back on and let the system recharge. Once the pump ceases to run, it’s time to thoroughly scrutinize the water pressure within your home to ensure the issue has been resolved.
Focus on fixtures most significantly impacted by the initial water pressure changes. By opening and closing the faucets, assess if the water flow harmonizes with your expectations, carefully observing any unusual sounds or indications of water hammering.
STEP 8. Secure the Locking Nut
Ensuring the locking nut or screw is securely fastened on the pressure regulator valve is crucial in maintaining consistent water pressure throughout your property. Once you have achieved the optimal pressure setting, it is imperative to lock down the locking nut or screw to stabilize the adjusted bolt in position.
This action guarantees that your home’s water pressure remains constant, providing an efficient water supply for daily activities.
What Happens If Water Pressure PSI is Too High on a Well Pump?
The water pressure PSI (pounds per square inch) on a Well Pump should be within a specific range to function efficiently and protect your plumbing fixtures, appliances, and overall water distribution system.
Here are some consequences if your Well pump system has too much pressure:
Damage to Plumbing Fixtures
Excessively high water pressure (PSI) in a Well pump system can harm the plumbing fixtures within a property. The immense stress exerted on the pipes may result in vexing issues such as leaks, burst pipes, and an amplified possibility of water damage.
In addition to this, the elevated pressure can compromise the integrity of the infrastructure, leading to additional leaks and damage. Furthermore, critical safety features such as pressure relief valves may become less effective, putting your property at risk of increased damage and potential flooding.
Consequently, it is crucial to monitor and regulate water pressure levels to safeguard your plumbing fixtures and the overall condition of your property.
Increased Water Bills
When the water pressure PSI is really high, it forces water to pass through the plumbing system at a higher rate, leading to increased water consumption. This increase in water usage will ultimately result in higher water bills for property owners.
Moreover, leakages caused by excessive water pressure can also contribute to higher water bills, as significant amounts of water may be wasted through small, undetected leaks. Thus, it is essential to maintain appropriate water pressure levels to avoid unnecessary expenses related to increased water consumption.
Reduced Lifespan of Appliances
High water pressure does not only impact plumbing fixtures and water bills but also affects your household appliances that depend on water supply. Appliances such as washing machines, dishwashers, and water heaters require a proper balance of water pressure to function efficiently and for a longer duration.
When appliances are subjected to consistently high water pressure, it can lead to wear and tear on internal components, resulting in a shortened lifespan and reduced efficiency.
In some cases, high water pressure can even cause appliance failure or complete breakdowns, leaving you with costly repair or replacement expenses. Furthermore, reduced appliance efficiency due to high water pressure can increase energy consumption, resulting in higher utility bills.
Higher Risk of Water Hammer
A water hammer, also known as hydraulic shock, is a phenomenon that occurs when a surge of pressure travels through your plumbing system. High water pressure can cause water to flow through the pipes at an excessive speed, resulting in a sudden stop or change in direction when a valve is closed abruptly.
This generates a shockwave that can cause severe damage to pipes, joints, and fixtures. When water outlet pressure PSI is excessive on a Well pump, it aggravates the risk of water hammer by intensifying the force of the shockwave. This can lead to costly repairs and replacements for damaged plumbing components.
Increased Risk of Leaks
As mentioned earlier, high water pressure can exert excessive force on the various components of your plumbing system, including pipes, joints, and fixtures. Over time, this added pressure can cause these parts to wear out faster, increasing the chances of leaks.
Leaks not only wastewater and increase utility bills but can also lead to water damage, mold growth, and structural issues in your home. In some cases, undetected leaks can cause flooding or foundation damage, costing you thousands of dollars in repairs.
Ensuring that water pressure PSI in Well pumps is regulated and within recommended limits is essential in preventing these long-term consequences.
What is the Normal Water Pressure for a House with a Well Pump?
A residence with a Well pump relies on a delicate balance of pressure to provide the perfect water flow for various everyday tasks. Striking an optimum water pressure range of 40 to 60 PSI is essential for maintaining a comfortable and efficient household.
This range ensures that tasks such as showering, washing dishes, and running multiple appliances concurrently will not be interrupted by fluctuating water pressure, leading to a satisfying experience. The Well pump utilizes a pressure switch to navigate this pressure range, turning on and off as required.
Also, a pressure tank is crucial in sustaining a steady water pressure within the plumbing system, allowing for seamless operation and a harmonious household environment.
What PSI Should a Well Pressure Tank be Set at?
Most Well pressure tanks come preset with a pressure switch with a 30/50 setting, meaning the pump kicks in when the water pressure drops to 30 PSI and shuts off when the pressure reaches 50 PSI. The 30/50 setting is generally suitable for most residential applications.
But, this setting can be adjusted depending on your specific needs and the demands of your household plumbing system. For example, if you require higher water pressure throughout your home, you might consider adjusting the pressure switch to a 40/60 setting.
Is Water Pressure at 100 PSI Too High for a Well Pump?
While a Well pump can tolerate water pressure up to 100 PSI, it is generally considered too high for residential plumbing systems. High water pressure beyond the standard 40 to 60 PSI range can stress your plumbing fixtures and lead to premature wear or leaks, which could result in costly repairs or water damage.
Furthermore, excessive water pressure can cause reduced flow rates for appliances, potentially affecting their performance and efficiency. To avoid these issues, keep your water pressure within the recommended range.
Can I Adjust the Water Pressure on a Well Pump With My Bare Hands?
Well pumps are vital for properties relying on groundwater for their water supply and must operate optimally. Adjusting the water pressure on a Well pump is possible, but it’s not an endeavor one should undertake with just a pair of bare hands.
The process necessitates utilizing specific tools, such as a screwdriver, wrench, or pliers, and a firm understanding of the Well pump system’s inner workings. Adjusting the pressure begins with the pressure switch, which increases or decreases water pressure accordingly.
While tempting to attempt, it’s vital to be well-versed in your well pump system’s intricacies before making any changes, ensuring proper functionality and longevity.
How Do I Know If My Water Pressure Regulator Valve is Faulty?
A water pressure regulator valve is crucial to your home’s plumbing system. Even so, like any mechanical device, the regulator valve can degrade over time and cause problems.
You’ll know if you’ve got bad water pressure regulators if you see these signs:
Fluctuating Water Pressure
A sudden change in your water flow, ranging from a weak dribble to a forceful gush, may point to a faulty water outlet pressure regulator valve. This vital component ensures a smooth and steady water supply through your pipes, making it essential for performing faucets, showers, and appliances.
It is not uncommon to experience inconsistent water pressure when the regulator malfunctions. But these fluctuations can occasionally be more challenging to spot, requiring a comparison over a longer period.
When you notice prolonged periods of weak water pressure, it’s essential to investigate and address the issue. It could point to a failing regulator valve that’s no longer maintaining the right balance to ensure an efficient water flow rate in your household.
Sudden High Water Pressure
When a water pressure regulator valve fails, it can sometimes result in sudden and extreme water pressure increases. This phenomenon poses a significant risk to your plumbing system, as high pressure can cause pipes to rupture, joints to leak, and fixtures to malfunction.
If you observe a sudden increase in water pressure, acting promptly to prevent damage is crucial. Contact a plumbing professional immediately to diagnose and address the issue.
Water Hammer
Water hammering refers to the noise of water suddenly stopping or changing direction in pipes, creating a loud banging or knocking sound. This noise often occurs when there is a sudden change in water pressure.
A faulty water pressure regulator valve may fail to manage the abrupt pressure changes, resulting in a water hammer that can weaken pipe joints and connections. If you repeatedly hear these loud noises in your plumbing system, consider having a plumber evaluate your water pressure regulator valve.
Leaking Pressure Regulator Valve
A clear sign of a failing water pressure regulator valve is a visible leak from the valve itself. Over time, the internal parts of the regulator can wear out or become damaged, causing water to seep through and collect around the valve.
If you notice water pooling beneath the regulator or damp spots around it, you should call a plumber to assess the situation and potentially replace the valve.
Adjust Your Well Pump System for Perfect Water Pressure
By following our simple yet practical guide, you should now understand how to adjust the water pressure regulator on your Well pump system. Turning the pressure regulator clockwise to increase pressure or counterclockwise to decrease pressure is all it takes to make a noticeable difference in your water system.
Remember that maintaining balanced water pressure is crucial for your home’s plumbing system health and your household’s overall comfort and convenience. If you still experience water pressure problems, it might be time to contact a professional plumber to inspect your Well pump system for any underlying issues.

