
Last Updated on February 6, 2025
To replace your bathtub overflow gasket, start by checking for leaks and removing the overflow drain plate with a Phillips screwdriver. Inspect the old gasket for damage and clean the area thoroughly. Install the new gasket, ensuring it fits snugly around the brass overflow pipe.
Reattach the overflow plate, tightening it carefully to avoid overtightening. Finally, conduct a water test to check for leaks. For more detailed steps and tips, explore the following sections.
Key Takeaways
- Inspect the existing gasket for wear or damage before removal to ensure a proper replacement.
- Remove the overflow drain plate using a Phillips screwdriver, taking care not to scratch the tub surface.
- Clean the area thoroughly before installing the new gasket to ensure a proper seal.
- Apply petroleum jelly to both sides of the new gasket for enhanced sealing and alignment.
- Reattach the overflow plate carefully, tightening it enough to compress the gasket without overtightening.
Identifying the Key Problem for Overflow Gasket
Identifying the problem with your bathtub overflow gasket is crucial for preventing water damage.
Start by checking for leaks; water leaking from the overflow drain’s top signals a gasket issue. If you notice water when the tub fills above the overflow drain, inspect further.
Test the gasket’s seal by gently moving it with a finger—if it shifts, it’s not sealing properly. Remove the overflow drain plate to examine the gasket and overflow pipe for wear or misalignment.
Verify the gasket’s beveled design is correctly oriented and that the overflow pipe isn’t rigid or off-center. Take care not to overtighten the drain plate during reinstallation, which can cause damage. Early detection is essential to prevent water damage and mold growth.
Gathering Necessary Materials for Replacement
Before starting your bathtub overflow gasket replacement, you’ll need to gather several essential materials to guarantee a smooth process.
First, select a compatible gasket that fits between the overflow plate and the tub, ideally a beveled design or a Universal Fit for broader compatibility.
Next, collect the necessary tools: a Phillips screwdriver, adjustable pliers, a tool for moving the overflow pipe, and needle nose pliers for tight spaces. Ensure you have a tub drain & spud wrench for removing the old tub shoe drain assembly.
You’ll also need a soft brush and soapy water for cleaning. Don’t forget additional supplies like plumber’s putty, overflow plate screws, and possibly a new overflow plate.
Finally, verify you’ve got safety precautions in place, like protective gear and access to the area behind the tub.
Removing the Overflow Drain Plate
Start by gathering your tools, as you’ll need a Phillips screwdriver, flathead screwdriver, adjustable pliers, and needle nose pliers to remove the overflow drain plate.
Begin by using the Phillips screwdriver to remove the mounting screws from the overflow plate, setting them aside for reuse.
After that, gently pull the bracket forward to access the gasket, but be careful not to scratch the bathtub surface. Ensure the surface is clean before installing the new gasket.
If the bracket resists, employ a gentle back-and-forth motion with your tools to dislodge it without causing damage. Once the bracket is detached, inspect the area for any grime or debris that needs cleaning before proceeding with the gasket removal.
Examining the Overflow Pipe
While examining the overflow pipe, it’s important to understand its role in draining excess water from the bathtub efficiently. The overflow pipe connects the overflow opening to the waste arm and typically runs vertically.
Look for common issues like clogs, cracks, and leaks. Inspect for leaks by checking for water seeping through any gaps. Clogs can block water flow, while misalignment may cause inefficient drainage and leaks. Additionally, many inspectors emphasize that testing for leaks could potentially uncover hidden problems during inspection.
Corrosion can weaken the pipe, so check for any signs of deterioration. Verify the pipe is the correct size; using the wrong size can lead to functional problems.
Removing and Replacing the Gasket
To replace the gasket, you’ll first need to remove the old one by disassembling the overflow cover, which requires unscrewing the mounting screws. Once you’ve accessed the gasket, follow the specific steps for installing the new gasket to guarantee a proper seal.
This process is essential for preventing leaks and maintaining your bathtub’s functionality. Be sure to check for significant water leakage after reassembly to ensure everything is properly sealed.
Gasket Removal Techniques
Removing a bathtub overflow gasket requires careful attention to detail and the right techniques. First, verify you have access to the back of the tub. Unscrew the overflow drain plate and, if needed, use a utility knife to cut away any caulk.
Examine the overflow pipe for obstructions. Locate the gasket, typically between the overflow pipe and the tub.
To remove the gasket, pull it free by hand or gently pry it out with a screwdriver. If it’s stuck, apply gentle pressure or use a tool to dislodge it. Avoid using force or harsh chemicals.
Once removed, inspect the gasket for damage. Finally, clean any debris with a paper towel to prepare for the new gasket installation. Additionally, be aware that a common source of leaks is the overflow tube or drain assembly.
Gasket Installation Steps
Replacing a bathtub overflow gasket involves several essential steps to confirm a proper fit and seal. Follow these steps for successful installation:
- Insert Gasket into Drain Hole: Carefully place the gasket into the drain hole, confirming it sits properly.
- Align and Secure: Align the gasket with the overflow pipe, then gently press it into place around the drain hole’s circumference. It’s important to note that using specialty tools can aid in securing the gasket effectively.
- Check for Leaks: After securing the gasket, run water to check for leaks.
Make sure the thicker side of the gasket faces down, and clean the installation area before starting. Once everything is in place, reattach the overflow plate, applying gentle pressure to confirm a watertight seal.
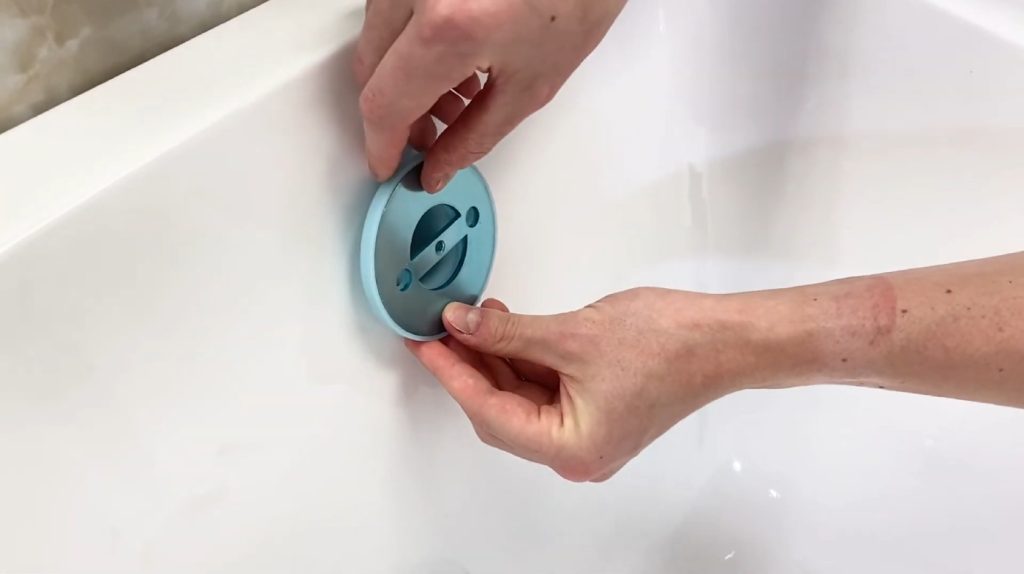
Reattaching the Overflow Drain Plate
To reattach the overflow drain plate, verify proper alignment by positioning the open slit downward. This allows excess water to flow correctly into the overflow drain. As you secure the plate, focus on compressing the gasket evenly to create a watertight seal without overtightening.
Additionally, applying Vaseline or petroleum jelly on both sides of the gasket can enhance the seal and prevent leaks.
Proper Plate Alignment
As you prepare to reattach the overflow drain plate, verify proper alignment for effective water drainage and to prevent leaks. Follow these steps to guarantee correct positioning:
- Make sure the breathing opening on the overflow plate faces downward for ideal water flow and air circulation.
- Position the overflow plate so the gap for drainage is at the bottom, allowing for maximum efficiency.
- Align the drain hole of the overflow plate with the bracket to make certain it functions properly when the tub is filled. This ensures that the overflow plate can effectively prevent overflow issues by redirecting excess water.
Gasket Compression Technique
With the overflow drain plate properly aligned, it’s time to focus on the gasket compression technique, which guarantees a watertight seal. Start by ensuring a tight fit: clear debris, center the gasket, and press it around the drain hole.
Avoid using tools to seat the gasket. Next, reattach the overflow plate, ensuring the slit points down. Tighten the plate carefully to compress the gasket without overtightening. Correct orientation is essential to prevent leakage, so double-check the gasket’s position before securing it.
| Step | Action |
|---|---|
| 1. Tight Fit | Clear debris and center gasket |
| 2. Attach Plate | Align the slit down and secure it |
| 3. Tighten Plate | Compress gasket with proper torque |
| 4. Verify Seal | Test for leaks by running water |
Conducting Final Checks
After you’ve installed the new overflow gasket, it’s essential to conduct final checks to confirm everything is functioning correctly.
Start by visually inspecting the gasket’s position and alignment, making sure there are no gaps or obstructions. Next, perform a water test to check for leaks and verify the overflow function.
- Check for leaks: Observe the area below the tub while filling it to the overflow level.
- Inspect gasket seal: Look for any signs of leakage or improper sealing.
- Confirm secure attachment: Verify the overflow plate is tightly fastened to compress the gasket. A properly functioning bathtub overflow drain helps to prevent flooding and accidents, especially for vulnerable individuals.
If you notice any issues, make necessary adjustments to achieve a watertight seal. These steps will guarantee your new gasket functions effectively.
Considering Professional Assistance
If you’re uncertain about the replacement process, hiring a professional can save you time and money in the long run. Their expertise guarantees the job is done correctly, minimizing the risk of leaks or further damage. While there’s a cost involved, the benefits of experience often outweigh the expenses, especially in complex plumbing situations.
Bathtub drain assemblies often require specific knowledge to ensure proper installation and function, making professional assistance a wise consideration.
Expertise and Experience Benefits
While tackling a bathtub overflow gasket replacement may seem straightforward, the expertise and experience of professionals can markedly enhance the outcome.
Professionals possess advanced tools designed for tight spaces, ensuring a precise gasket replacement. They accurately diagnose leaks, identifying issues beyond the gasket itself, which might save you from additional complications.
Additionally, they can provide insights on various plumbing issues that might be impacting your bathtub’s performance. With their extensive knowledge, they can address potential plumbing problems, ensuring your system operates efficiently. Proper installation by experts minimizes the risk of additional leaks.
In addition, hiring professionals is time-efficient; they quickly resolve issues, reducing the chance of water damage.
Ensuring Regular Maintenance
Regular maintenance is essential to keep your bathtub in ideal condition and extend its lifespan. Establishing a cleaning routine helps to prevent stubborn stains and grime buildup. Aim for a monthly cleaning schedule using non-abrasive cleaners suitable for your bathtub’s material.
- Use soft sponges to avoid scratches.
- Increase cleaning frequency if the bathtub sees heavy use.
- Inspect regularly for early signs of wear and tear.
Additionally, drying the bathtub after each use can prevent water spots, while regular drain maintenance prevents clogs. Having at least one bathtub is important for attracting a wide range of buyers, so maintaining its condition is vital.
Frequently Asked Questions
How Often Should I Replace the Bathtub Overflow Gasket?
Imagine stepping into your bathroom, only to find unsightly water stains creeping up the wall. You should replace your bathtub overflow gasket every 10 years, but keep an eye out for leaks or deterioration sooner.
Regular inspections can help catch issues before they escalate, saving you from costly repairs. If your family uses the tub heavily or you notice wear-and-tear, consider replacing the gasket more frequently to maintain a leak-free environment.
Can I Use a Different Material for the Gasket?
You can use different materials for the gasket, but it’s important to choose wisely. Rubber or silicone gaskets are standard due to their durability and water resistance. While PVC is an option, it’s less common.
Make sure the material is compatible with your tub and overflow assembly. Avoid using low-quality options, as they can lead to leaks. Proper installation is essential, regardless of the material you choose, to maintain a watertight seal.
What Tools Do I Need for This Repair?
For this repair, you’ll need a few essential tools. Grab a screwdriver to remove the overflow plate, a utility knife to clear old gasket material, and adjustable pliers for tightening or loosening parts.
Have a rag handy to clean the area, and make sure to get a new overflow gasket. Depending on your setup, a flathead or Phillips screwdriver may be necessary. Finally, consider plumber’s putty for sealing connections effectively.
Will Replacing the Gasket Improve Water Drainage?
Imagine your bathtub as a dam holding back a river. If the overflow gasket‘s compromised, water spills over the edges, creating chaos. Replacing the gasket definitely improves water drainage by sealing the gap between the overflow plate and tub.
This guarantees excess water flows directly into the drain, preventing leaks that could damage your home. A well-installed gasket protects your space and enhances safety, making your bathing experience worry-free.
How Can I Prevent Future Overflow Leaks?
To prevent future overflow leaks, regularly inspect the overflow drain for moisture and signs of wear. Clean the drain every few months to avoid debris buildup.
Confirm the gasket is installed correctly and replace it if you notice cracks or tears. Test the overflow by filling the tub to the opening level and watch for leaks.
Avoid Costly Repairs: Replace Your Bathtub Overflow Gasket
Replacing a bathtub overflow gasket is like patching a tire; it’s crucial for preventing leaks and maintaining functionality. Just as a small puncture can lead to a blowout, a worn gasket can cause water damage.
By following the steps outlined, you can guarantee your tub remains leak-free and functional. Remember, regular maintenance is key—check your gasket periodically, just as you would inspect your tires, to avoid bigger issues down the road.

