Last Updated on May 18, 2023
When your washing machine goes haywire and the shut-off valve isn’t playing nice, don’t get caught up in a laundry cycle of frustration. Fixing it is as easy as pie.
To complete this repair job, you’ll need an adjustable wrench, screwdriver and some new parts: valve stem, packing & O-rings. Then turn off the water supply before popping out the old part for a closer look at its state.
If any of these components are worn down with age, then it’s time to swap them out. Test it for leaks or other issues to be safe when everything is back together.
Get your toolbox ready, we’re diving into how to repair a shut-off valve for washing machines. No need to worry. Just buckle up and follow our step-by-step guide.
How to Repair Shut Off Valve for Washing Machine: 6 Easy Steps

Several steps need to be taken to repair a washing machine’s shut-off valve. Before you start, you’ll need the right tools and materials.
Tools and Materials Needed
The necessary tools and materials for this task include an adjustable wrench, screwdriver, new valve stem (if required), new packing and O-rings (if needed), as well as a cleaning solution consisting of water and vinegar.
The adjustable wrench is used to loosen the nut that secures the valve stem in place, while the screwdriver is used to remove any screws that hold the handle or cover plate in place.
The new valve stem may be required if the old one is damaged beyond repair, while new packing and O-rings may also be needed if they are worn out or damaged.
Step 1: Turn off the Water Supply
Locate the main water supply valve for your home. It is usually located near the foundation wall where the main water line enters the house.
Turn off the main water supply valve by turning it clockwise until it stops moving. Open a faucet or a hose bib in your home to relieve any pressure and drain any remaining water from the pipes.
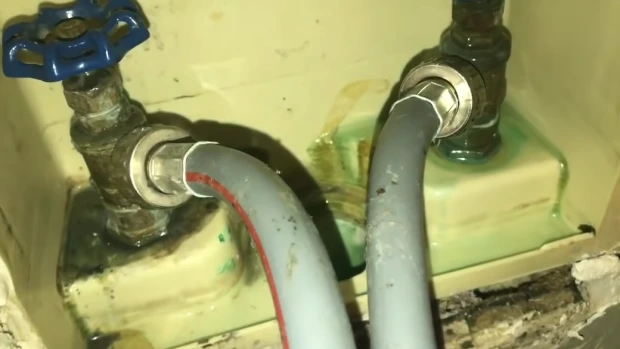
Step 2: Remove the Valve from the Water Line
To begin this removal process, use an adjustable wrench to loosen the nuts on both sides of the shut-off valve. Make sure to support the valve with one hand while using the other hand to turn the wrench counterclockwise on each nut until they are loose.
Once you have loosened both nuts, use your hand to remove the valve from the water line. It is essential to be gentle when removing it so as not to damage any surrounding pipes or fittings.
If there is any resistance, check that all nuts are completely loosened before continuing.
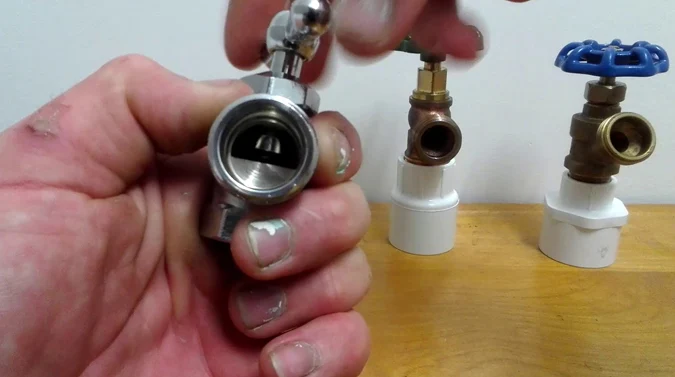
Step 3: Disassemble the Valve

This process involves removing the handle and packing nut from the valve body using appropriate tools such as a screwdriver and adjustable wrench.
After that, removing the old valve stem and O-rings from the valve body is necessary. Disassembly can help identify issues with worn-out components that may require replacement.
For instance, if there are leaks around the valve stem, this could be an indication of damaged O-rings or other faulty parts. So, disassembling the valve can reveal these problems and allow for proper repair or replacement of components.
Step 4: Replace the Faulty Components
Replacing Valve Stem (If Necessary)
After disassembling the valve, the next step is to check the condition of the valve stem. It will need to be replaced if it appears worn out or corroded. This relatively easy process involves inserting a new valve stem into the valve body and reattaching the packing nut.
Remove any remaining parts from the valve body to replace the valve stem. Then, insert the new valve stem into place and tighten it securely with a wrench. Then, reattach any other parts you removed to access the valve stem and test your repair work.
It’s important to note that not all shut-off valves require a replacement of their stems. In some cases, simply cleaning or lubricating them can help restore functionality without replacing any parts. Be sure to assess each situation individually before deciding whether a full replacement is necessary.
Replacing the Packing (If Necessary)
If the packing is damaged or worn out, it can cause leaks that may result in water damage to surrounding areas.
Use a wrench to loosen and remove the packing nut from around the valve stem. Once removed, take out any remaining pieces of old packing material from inside of it.
Next, insert new pieces of packing material into where you removed them from and push them down into place so they are snug against each other.
Ensure you don’t over-tighten when tightening back up again because this could cause damage or leaks down the line later on down the road.
Ensure that everything is secure before turning on your main water supply again for testing. Congratulations if there are no leaks after testing, your washing machine’s shut-off water valve has been successfully repaired.
Replacing the O-Rings (If Necessary)
If you see that the o-rings are torn or worn out, you might have to replace them. To replace the O-rings, remove the old ones carefully and insert new ones into the valve body and handle.
You need to pay attention to detail and be skilled because it can cause further damage if you don’t.
Step 5: Clean the Valve
You need to use a high-pressure stream of water to remove any remaining debris or mineral deposits from both the valve body and internal components.
Be sure to direct the stream of water away from your hands and face as you flush out any obstructions that may have accumulated inside the unit.
Once cleaned thoroughly, reassemble all components in reverse order with new Teflon tape on all threaded connections before testing for leaks by turning on the water supply and observing for any signs of drips or seepage around fittings or valves.
Step 6: Reassemble the Valve
To continue repairing the shut-off valve for your washing machine, it is now time to reassemble the valve. The following are steps to follow when reassembling the valve:
– Place the rubber gasket onto the stem of the valve
– Slide the spring over the stem and onto the gasket
– Screw on the bonnet and tighten it securely
– Reattach any necessary pipes or hoses to complete the installation
– Turn on the water supply and test for proper functionality
What causes a washing machine shut-off valve to leak?
The failure of a washing machine’s shut-off valve to properly function can result in the catastrophic flooding of one’s home, leading to extensive damage and costly repairs.
The most common cause of a leaking valve is age-related wear and tear. Over time, the rubber washer inside the valve may become brittle or damaged, causing it to lose its seal and allowing water to leak out.
Another potential cause of a leaking shut-off washing machine valve is corrosion. If the valve is made from metal, it may be susceptible to rust or other forms of corrosion that weaken its structure and compromise its ability to hold back water.
Also, if the valve is not used frequently enough, mineral deposits from hard water may build up inside it, further contributing to leaks.
Improper installation or over tightening of plumbing connections can also lead to leaks in a washing machine water shut off valve.
If the threads on the connection are stripped or damaged during installation, they may not form a tight seal with the valve body when tightened.
This can allow water to seep through connections’ gaps over time, eventually leading to significant leaks.
How long should a washing machine shut-off valve last?
The longevity of the washing machine shut-off valves depends on various factors such as quality, usage frequency, maintenance practices, and environmental conditions. On average, a high-quality washing machine shut-off valve can last for up to 10 years or more with proper care and regular maintenance.
But, this duration may vary depending on the frequency of use and whether it is subjected to harsh environmental conditions such as extreme temperatures or corrosive substances.
Valves that are constantly exposed to moisture or chemicals may develop rust or corrosion over time, leading to premature failure. To extend the lifespan of your washing machine shut-off valve, it is essential to conduct regular inspections and replace any worn-out parts promptly.
You should also turn off the valve when not in use and avoid forcing it beyond its capacity by applying excessive force during operation. Also, you should ensure that there are no obstructions in your plumbing system that could cause excessive pressure buildup on the valve.
How can you find a quality washing machine shut-off valve that lasts a long?

If you’re looking for a washing machine shut-off valve that will stand the test of time, it’s essential to pick one with high-quality materials and trusty features.
When choosing your preferred option, take into account things like its build strength, how user-friendly it is, and whether or not it works perfectly in harmony with your appliance, don’t settle for second best.
To make your search easier, we’ve reviewed some of the top-rated washing machine shut-off valves on the market, taking into account their specifications and features. By browsing these reviews, you can find the best washing machine shut off valve for your needs without any hassle.
Don’t Delay – Quickly Repair Your Shut-Off Valve and Avoid Unnecessary Costs
Repairing the shut-off valve on your washing machine is not difficult, but addressing it as soon as possible is vital. Neglecting to fix the valve may result in more severe damage by flooding.
Hopefully, this step-by-step guide can help you repair your shut-off valve quickly and efficiently. Remember, if you’re unsure of any steps, always seek the assistance of a professional plumber to avoid costly mistakes.

