
Last Updated on February 11, 2025
To install a toilet bowl gasket, start by turning off the water supply and flushing the toilet to drain it. Remove the old gasket and clean the area around the flange.
Place the new gasket in position and align it with the tank and bowl openings. Reattach the tank and tighten bolts securely but avoid over-tightening.
After reassembling, test for leaks using a dye test to confirm a proper seal. There’s more to perfecting your installation process ahead.
Key Takeaways
- Turn off the water supply, flush the toilet, and drain the tank to prepare for gasket installation.
- Remove the tank by loosening the brass nuts and thoroughly clean the area while inspecting for damage.
- Align the new gasket with the tank and bowl openings, ensuring a proper seal to prevent leaks.
- Hand-tighten bolts first, then use a wrench for final tightening while ensuring even pressure around the tank.
- Conduct a flush test and check for leaks, verifying that the gasket is intact and all connections are secure.
Preparation and Tools
Before you start installing your toilet bowl gasket, it’s crucial to prepare properly and gather the right tools. First, locate and turn off the water supply valve beneath the toilet. Flush the toilet to drain both the bowl and tank.
Clean the area around the toilet to eliminate any debris. Assemble necessary tools, including an adjustable wrench, putty knife, gloves, buckets or sponges, and measuring tape.
Make sure to shut off the water supply to ensure a smooth installation process. Verify the floor is level and free of dust or old gasket residue.
You’ll need materials like a wax ring or gasket, toilet bolts, wood shims for leveling, caulk for sealing, and possibly a new toilet flange if the old one is damaged.
Removing the Old Gasket
To remove the old gasket, start by shutting off the water supply to prevent leaks. Next, remove the tank by loosening the brass nuts located underneath the bowl.
With the tank taken off, you’ll have access to the old gasket. Use a paper towel to clean the area thoroughly, removing any residue. Ensure the toilet is completely disassembled before proceeding with the gasket replacement.
Inspect the flange and surrounding area for damage. Be aware that corrosion can make bolts difficult to remove, so you might need tools like hacksaws.
If screws break, consider drilling nearby holes for easier removal. Handle lead bends carefully to avoid damage, and always wear protective gear to guard against sharp edges.
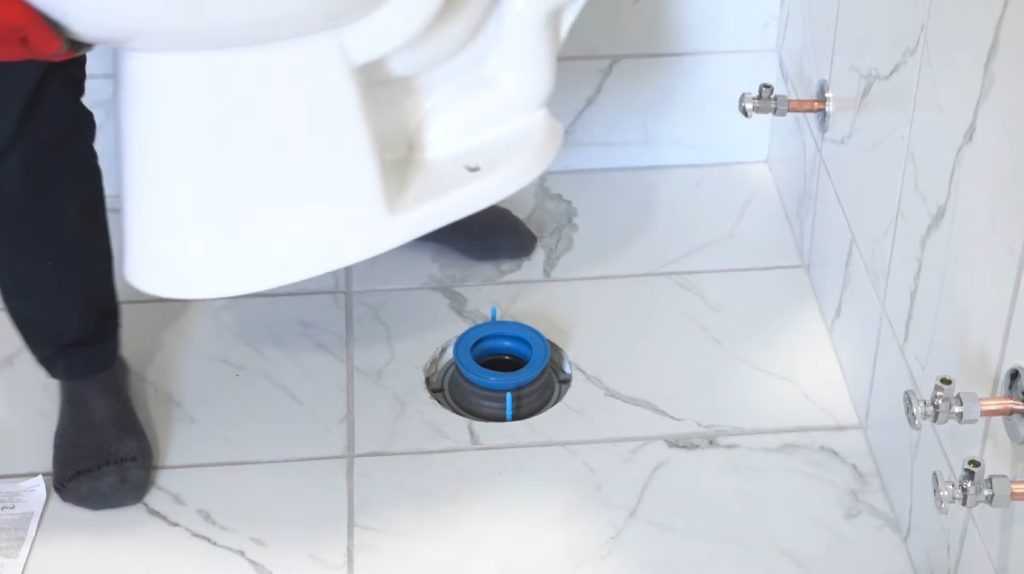
Installing the New Gasket
To install the new gasket, start by ensuring it’s properly aligned with the tank and bowl openings. This alignment is essential for a secure fit that prevents leaks.
Once positioned, press down gently to secure the gasket and confirm it sits evenly before proceeding with the installation.
Additionally, it’s important to ensure the gasket’s seal is intact to avoid any water leaks once the toilet is reassembled.
Proper Gasket Alignment
How do you guarantee that the new gasket fits perfectly during installation? Start by verifying you’ve gathered all necessary materials and that the area is clean.
Next, align the new gasket with the mounting nut threads, making sure it sits snugly over the hardware. To help you visualize the process, refer to the table below:
| Step | Action |
|---|---|
| Gasket Type | Identify sponge or rubber type |
| Gasket Alignment | Align with mounting nut threads |
| Gasket Placement | Verify snug fit over hardware |
| Temporary Hold | Secure during tank reattachment |
| Obstruction Check | Confirm no debris obstructs placement |
With these steps, you’ll verify the gasket is properly aligned before proceeding with the reattachment of the tank. Remember to replace the gaskets on both the fill valve and flush valve to ensure a leak-free installation.
Securing Gasket Fit
While installing the new gasket, guarantee a tight fit to prevent leaks. Start by ensuring the gasket is centered over the mounting nut threads. Use the correct washer order: place the bolts, rubber washers through the tank, followed by additional rubber washers, metal washers, and nuts.
Tighten the bolts evenly to avoid cracking the porcelain—don’t over-tighten. Applying silicone caulk around the base of the toilet after installation can further prevent unwanted leaks. Apply gentle downward pressure to maintain tank level during installation.
After securing everything, turn on the water supply and inspect for leaks. If you notice any, double-check your installation, as improper securing is a common issue. For best results, consult online tutorials or plumbing forums for additional guidance tailored to your specific toilet brand.
Reassembling the Toilet Tank
Now that the new gasket is in place, it’s time to reassemble the toilet tank.
Start by reinserting the tank bolts, ensuring you add the rubber and metal washers correctly for a secure fit. Turning off the water supply is essential before starting this process to prevent any mishaps.
Finally, use the proper tightening techniques to avoid damage while ensuring a leak-proof seal.
Reinserting Tank Bolts
Reinserting tank bolts is an essential step in reassembling the toilet tank after replacing the gasket. Begin by guiding the new bolts through the holes in the toilet tank and bowl.
Confirm everything aligns correctly to prevent misplacement.
- Use a screwdriver or wrench for proper alignment.
- Check that all bolts and washers are securely positioned.
- Align the bolts with the bowl’s holes carefully.
- Employ a flathead screwdriver if needed to push washers into place.
- Handle components gently to avoid damaging the porcelain.
Once aligned, you can proceed to secure and tighten the bolts, confirming a stable installation. This will help maintain the integrity of your toilet system moving forward.
Additionally, remember to install rubber washers between the tank and bowl to create a watertight seal.
Adding Washers Correctly
After securing the tank bolts, adding washers correctly is essential for a watertight seal between the toilet tank and bowl. Start by placing rubber washers directly against the porcelain to guarantee a tight seal.
Next, position metal washers on top of the rubber ones to enhance durability and prevent excessive compression. The specific arrangement—rubber followed by metal or vice versa—depends on your toilet’s design, so refer to the instructions for your model.
If necessary, add any additional washers or nuts at the bolt base. Confirm all washers are aligned properly before proceeding to lower the tank into position.
This careful setup will help prevent leaks and maintain a secure fit during use. Additionally, timely replacement of the toilet gasket can prevent potential bathroom flooding.
Final Tightening Techniques
To achieve a secure and leak-free connection between the toilet tank and bowl, follow these final tightening techniques carefully.
Begin by ensuring the tank’s alignment with the bowl for even pressure distribution. Hand-tighten the bolts first, then use a wrench for final tightening.
Remember to tighten progressively around the tank to avoid cracks in the porcelain. Additionally, ensure the bolts are secured from the bottom side to maintain stability.
- Check for corroded bolts and replace if necessary.
- Apply penetrating oil to stubborn bolts for easier loosening.
- Avoid over-tightening to protect the porcelain.
- Inspect the gasket for wear before tightening.
- Conduct a flush test to confirm no leaks.
Reconnecting Essential Components
Once the toilet bowl is securely in place, it’s time to reconnect essential components to restore functionality.
Start by attaching the toilet seat according to the manufacturer’s instructions. Next, reconnect the water supply hose, ensuring it’s securely fastened to prevent leaks.
It’s important to check for leaks after reconnecting these components to ensure everything is functioning properly. Proper installation techniques can significantly enhance seal durability and prevent future leaks.
If applicable, install the tank by aligning it with the bowl and securing it with rubber and metal washers. Make sure the tank is level for proper operation. Gradually tighten the tank bolts, ensuring even pressure to avoid misalignment or cracking.
After reconnecting these components, double-check that everything is aligned correctly and securely fastened. This will set the stage for a proper test of the system in the next steps.
Testing for Leaks
Testing for leaks is essential to confirm your toilet operates efficiently and prevents water waste. Start by using the dye test method, where you add non-toxic dye strips or food coloring to the tank and wait 30 minutes to check the bowl for color changes.
If you see color, a leak exists. Common leak locations include:
- Wax ring at the toilet base
- Flapper issues causing water flow
- Misaligned overflow tube
- Loose tee bolts around the base
- Improper water level adjustments
To diagnose leaks, mark the water level in the tank and check for changes after 30 minutes. Remember that toilets are the number one water wasters globally, so regular maintenance and thorough inspections will help confirm your toilet remains leak-free and functioning properly.
Additionally, worn parts can also contribute to leaks, emphasizing the need for consistent checks and potential replacements to maintain optimal performance.
Post-Installation Checks
Post-installation checks are essential to guaranteeing your toilet functions correctly and efficiently. Start by tightening all bolts and nuts until snug, but avoid over-tightening to prevent damage.
Next, verify that the water supply line is securely attached. Confirm the tank is aligned properly with the bowl and inspect the gasket for any deformation or misalignment. Additionally, ensure that there are no water leaks originating from the toilet tank.
Conduct initial flushes to confirm proper water flow and check for leaks. Monitor the water level for consistency and inspect the fill valve’s functionality. Make sure the float is unobstructed and aligned correctly. Finally, test the flush handle for smooth operation.
Final Verification
To guarantee everything functions properly after installing the toilet bowl gasket, perform a thorough final verification.
Check for leaks and verify all components are secure and aligned.
- Inspect the area around the gasket for any signs of water.
- Confirm that the gasket size matches the toilet specifications.
- Verify all bolts are tightened alternately to maintain even pressure.
- Look for signs of porcelain cracking from over-tightening.
- Test the toilet by flushing to check for proper seal and leaks.
Frequently Asked Questions
How Often Should I Replace the Toilet Bowl Gasket?
You shouldn’t need to replace the toilet bowl gasket frequently unless you notice leaks or significant wear. Most gaskets last a long time without issues. Keep an eye out for visible leaks around the toilet base or water seepage, as these can indicate a failing seal.
If you experience wobbliness or unusual noises during flushing, it might be time to inspect the gasket and consider a replacement. Regular checks can prevent bigger problems.
What Type of Gasket Material Is Best for My Toilet?
When choosing the best gasket material for your toilet, consider wax, wax-free, and elastomer options. Wax gaskets are cost-effective and conformable, but can be affected by temperature changes.
Wax-free gaskets offer mess-free installation and flexibility. Elastomer gaskets combine durability and sealing ability, providing a reliable option.
Assess your toilet’s design and flooring type, and select a gasket that fits your specific needs for peak performance and longevity.
Can I Install a Gasket Without Professional Help?
Yes, you can install a gasket without professional help. With basic DIY plumbing skills, you’ll be able to handle the task effectively. Gather your tools, make certain you shut off the water supply, and follow the proper steps for removal and installation.
Just be cautious not to over-tighten any bolts, as that can damage the porcelain. If you take your time and double-check connections, you’ll achieve a successful installation.
What Are Common Signs of a Failing Toilet Gasket?
Common signs of a failing toilet gasket include visible leaks, such as water pooling around the base, and unpleasant odors indicating sewer gas escape.
You might notice your toilet feels wobbly, signaling a compromised seal. Additionally, check for soft or spongy flooring nearby; this can indicate water damage.
If you see mold growth or hear gurgling noises, these are further indicators that your gasket may need replacement. Regular inspections can help catch these issues early.
Do I Need to Turn off the Main Water Supply?
Absolutely, you need to turn off the main water supply before diving into any toilet repairs. Think of it as putting on a seatbelt before a drive—it’s essential for safety. Shutting off the water prevents leaks and accidents, ensuring a dry workspace.
Locate the primary shut-off valve, turn it off, and flush the toilet to drain the tank. This simple step sets you up for a smooth, leak-free installation experience.
Extend Your Toilet’s Lifespan with Simple Maintenance
By following these steps, you’ve successfully installed a new toilet bowl gasket, preventing leaks that can waste up to 200 gallons of water a day. With your toilet now sealed properly, you’re not only saving water but also enhancing your bathroom’s efficiency.
Remember to conduct regular checks to verify everything remains intact. With proper maintenance, you can extend the lifespan of your toilet and prevent costly repairs in the future.

