Last Updated on May 9, 2023
Dealing with a malfunctioning sewage ejector pump can be a messy and unpleasant experience. No one wants to deal with sewage backups, unpleasant smells, or unsanitary conditions. But do you know how to fix a sewage ejector pump with minimal effort and expense?
The first step in fixing a sewage ejector pump is to turn off the power supply. Then disconnect the plumbing from the pump and remove the pump from the basin. Inspect the pump for damage, such as broken parts or clogs, and replace them with new ones.
Next, clean out the basin and remove any debris or obstructions that may be causing the pump to malfunction. Reinstall the pump and reconnect the plumbing to it. After ensuring all parts are firmly secured, restore the power supply and test your pump by running some water through it.
Here we will go through the step-by-step process of fixing a sewage ejector pump, ensuring you understand the task.
Steps on How to Fix a Sewage Ejector Pump

Fixing a sewage ejector pump can be challenging, and it is important to proceed carefully to avoid further damage or injury. Here are the steps you should follow:
Step 01: Turn Off the Power Supply
There are two methods of turning off the power supply. You can unplug the ejector pump or shut off the circuit breaker that supplies power to the pump. If you choose to unplug the pump, locate the plug and gently pull it out of the socket.
If you opt to shut off the circuit breaker, locate the circuit breaker panel and turn off the pump’s circuit breaker. Tagging or marking the breaker is essential so other individuals do not accidentally switch it back on.
Before proceeding, make sure to check that the power is off by using a voltage meter.
Step 02: Disconnect the Plumbing
Once the power is off, it is time to disconnect the plumbing. You will need to remove the pipes that connect to the sewage ejector pump, which may require using a wrench or pliers.
It is essential to wear protective gloves when handling pipes as they may be sharp or corroded, causing injury to your hands. Begin by loosening the nuts that secure the pipes to the pump, then gently pull the pipes out of the pump.
If the pipes are corroded and difficult to remove, use a pipe cutter to cut the pipe near the pump. Ensure a bucket or tray is under to catch any water or sewage that may spill out.
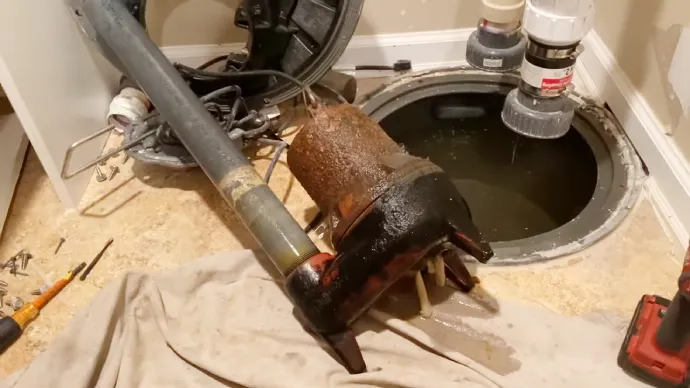
Step 03: Remove the Pump from the Basin
The next step is to remove the sewage ejector pump from the basin. Depending on the design of the pump, this may involve removing bolts or screws that hold the pump in place. You may need to use a pry bar or other tools to loosen the pump.
Before removing the pump, it is essential to note the position of the discharge, vent, and inlet pipes. Remember to take pictures or mark the position of the pipes to avoid any confusion when reconnecting them later.
After removing the bolts or screws, gently lift the pump out of the basin, not damaging the float switch or other electrical components.
Step 04: Inspection and Replacement of Damaged Pump Parts
When inspecting a sewage ejector pump, there are several crucial internal parts that one should carefully examine. The power and switch connection, impeller, motor, float switch, and check valve are all components that can wear down over time and experience various types of damage.
As such, it is important to know how to inspect these parts for damage and how to replace them if necessary.
The power and switch connection should be checked to ensure that it is properly connected and that there are no loose or broken wires. Check the electric wire connection and wiring diagram to ensure they are correct.
Also, check the insulation on the power and switch connection for signs of wear and tear. If any of these components look damaged or worn, replacing them with new parts may be necessary.
The impeller is a critical component of the pump that moves the wastewater through the system and out to the sewer. Therefore it is essential to check for any signs of wear or damage, including cracks, chips, or eroded parts.
A damaged impeller can cause problems with the pump’s efficiency and could lead to further damage to other internal components. In such cases, the impeller would need to be replaced as soon as possible to prevent further damage.
The motor is another critical component that powers the impeller and moves wastewater through the system. Inspecting the motor for damage involves checking for any abnormalities, such as overheating, electrical shorts, or rusting.
If any damage is noticed, it is necessary to replace the motor to prevent the system from failing or shutting down unexpectedly.
The float switch is a vital part of the ejector pump that turns it on and off based on the water level in the pit. Inspection for damage involves looking for broken or missing components, wear signs, and debris buildup.
Any damage to the float switch could cause the pump to malfunction, leading to water or sewage backup in the system. In this case, the switch would need to be replaced to ensure proper functioning.
The check valve is another critical component of the ejector pump that prevents wastewater from flowing back into the pit after being pumped out. Inspection of the check valve involves checking for any cracks, chips, or signs of wear that could lead to it failing.
A damaged check valve may cause wastewater to flow back, creating a blockage in the system and causing significant damage. A replacement would be necessary in such cases to prevent further issues.
Step 05: Clean the Basin (Optional)
While you have the sewage ejector pump removed, it is a good idea to clean the basin. You can use a hose, suction device, or other cleaning tool to remove any debris or sediment accumulated in the basin.
Be sure to wear protective gloves and eyewear, as you may encounter hazardous materials. Rinse the basin thoroughly, and disinfect it using a mild detergent solution.
Step 06: Reinstall the Pump
Once you have repaired or replaced any damaged parts, it is time to reinstall the sewage ejector pump. Follow the manufacturer’s instructions for securing the pump in place. You can then attach any necessary electrical wiring and piping.
Step 07: Reconnect the Plumbing
It is time to reconnect the plumbing with the sewer ejector pump back in place. Start by reattaching the discharge pipe first, then connect the vent and inlet pipes. Tighten the nuts into place with a wrench or pliers, ensuring that the connections are secure and leak-free.
Step 08: Restore Power and Test the Pump
Finally, it is time to restore power to the sewage ejector pump and test it to ensure it works correctly. Turn on the circuit breaker or plug in the pump and listen for any unusual sounds or vibrations.
Run some water through the pump to confirm that it is flushing correctly and that there are no leaks in the plumbing. Dispose of sewage or wastewater properly, following the relevant regulations and safety procedures.
And maintain your sewage ejector pump regularly to prevent any future problems.
How to change an ejector pump?

- The first step is to turn off the ejector pump’s power supply to prevent accidents.
- Next, you need to disconnect the pipes that connect to the ejector pump. Depending on the type of pump and the installation, there may be several pipes that need to be disconnected.
- After disconnecting the pipes, you can remove the sump pump from its mounting location. Depending on the pump’s design, this may require eliminating bolts or other attachments.
- With the old pump removed, you can install the new one. Follow the manufacturer’s instructions for installation, and ensure that any connections or attachments are appropriately secured.
- Once the new sump pump is installed, you can reconnect the disconnected pipes. Again, follow the manufacturer’s instructions to ensure the pipes are correctly connected and secured.
- Finally, you can turn the power supply back on and test the new pump to ensure it works correctly. If everything is functioning properly, you should have a working ejector sump pump instead of the old one.
What causes an ejector pump to stop working?
Several factors can cause these sewage ejector pumps to stop working, such as power loss, blockages, mechanical failure, installation problems, float switch malfunctions, and electrical issues.
Power outages or blown fuses can cause an ejector submersible sump pump to stop working. In contrast, accumulating solids in the pump can lead to clogs or blockages that impede efficiency.
Moreover, the wear and tear effects on the impeller or motor can cause mechanical failure, while improper installation or incorrect sizing can prevent the pump from working correctly.
Electrical problems such as faulty wiring, a damaged switch, or a bad capacitor can also affect the pump’s functionality. Therefore, it is necessary to ensure that these issues are promptly addressed to avoid property damage or health hazards.
What causes an ejector pump not to build pressure?

Sewage Ejector sump pumps require specific conditions to build pressure and move fluids and solids through the system. Blockages or clogs in the line supplying high-pressure fluid or gas to the pump can prevent the pump from generating pressure.
Also, a damaged or worn-out nozzle can disrupt the vacuum created by the ejector pump, impeding the pressure buildup. Furthermore, leaks in the system can compromise the vacuum, making it hard for the sewer pump to build pressure.
An insufficient supply of high-pressure fluid or gas can also prevent the pump from building enough vacuum to generate the required pressure. Mechanical issues such as worn-out seals, damaged impellers, misaligned parts, or bearings interfere with the pump’s ability to generate pressure.
Hence, proper maintenance should be conducted regularly, and any issues should be identified and addressed promptly to keep the system functional and efficient.
Master the Art of Sewage Ejector Pump Repair
Repairing a sewage ejector pump is relatively straightforward and does not require a professional plumber. Following the steps above, you can easily maintain and fix any issues with your sewage ejector pump.
Cleaning the basin, inspecting for damages, and replacing damaged parts are simple measures that will go a long way in preventing sewage backups or malfunctions. Take safety precautions like turning off the power and wearing gloves when you do sewer ejector pump repair.
With these steps, you can effectively and efficiently fix any damage to your sewage ejector pump.

