Last Updated on May 8, 2023
Do you struggle with low water pressure in your toilet or constantly hear the sound of running water? These common problems often indicate a dirty or clogged toilet fill valve. A dirty fill valve can waste water, increase utility bills, and even lead to more significant problems.
Cleaning the fill valve on the toilet involves removing the valve from the tank and wiping it down with a cloth or sponge to remove any build-up of minerals.
It may also involve soaking the valve in a cleaning solution to dissolve mineral buildup. The fill valve should be reassembled and tested to ensure proper functioning before replacing it in the tank.
So, learn how to clean your toilet fill valve using our step-by-step instructions and this article’s information. By the end of this blog, you will have the knowledge and confidence to take action and keep your toilets running smoothly.
How To Clean Fill Valve On Toilet: Easy Steps Guide

Use the appropriate cleaning materials to avoid damaging the fill valve or the toilet. Regular cleaning and servicing of the fill valve can help to ensure that the toilet operates properly and can extend its lifespan. Here is a step-by-step guide for cleaning the fill valve on a toilet:
Turn off the Water Supply: Turn off the water supply to the toilet by turning the valve clockwise. Flush the toilet to evacuate the tank and ensure no water is flowing.
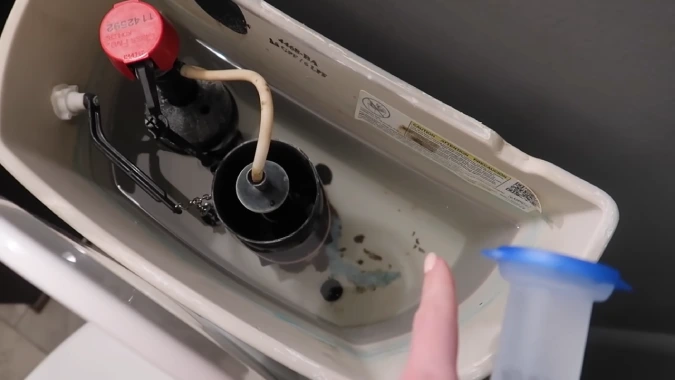
Remove Fill Valve: Locate the fill valve in the tank and use an adjustable wrench to remove the nut that holds it in place. Carefully lift the fill valve out of the tank.
Clean the Fill Valve: Clean the fill valve with a cleaning cloth or a toothbrush, removing any dirt that may be accumulated. If there is any mineral buildup or debris, soak the fill valve in a mixture of white vinegar and baking soda for 15-30 minutes, then scrub with a toothbrush.
Clean the Tank: Clean the inside of the tank with a cleaning cloth, removing any dirt or debris that may have accumulated.
Reinstall Fill Valve: Reinstall the fill valve back into the tank and tighten the nut to secure it in place.
Adjust the Fill Valve: Adjust the fill valve height by turning the screw located on the top of the valve. This will control the water level in the tank. The water level should be about 1 inch below the overflow pipe.
Turn on the Water Supply: Turn the water supply back on by turning the valve counter-clockwise and allowing the tank to refill. Check for any leaks around the fill valve and the tank.
Test the Toilet: Flush the toilet several times to test the fill valve. When the tank’s water level returns to the correct level after each flush and there are no leaks, the fill valve has been successfully cleaned.
Know the Components of a Fill Valve Before Cleaning

Knowing the components of fill valves in toilets before cleaning is important. It helps identify potential problems, maintain proper function, replace worn or damaged parts, and choose the right cleaning products or methods.
This knowledge helps to ensure effective cleaning and maintenance of the fill valve, which prolongs its lifespan and keeps the toilet functioning correctly.
Float: The float is a buoyant device that rises and falls with its water level, signaling the fill valve to turn on or off.
Shaft: The shaft connects the float to the valve, allowing the float’s movements to control the valve’s actions.
Valve: The valve controls the water inflow and regulates the water level.
Refill tube: The refill tube is a small plastic tube that carries water from the valve to the overflow pipe.
Overflow pipe: The overflow pipe is a safety feature that allows excess water to escape the tank if the fill valve malfunctions.
Nut and washer: The nut and washer secure the fill valve, connecting it to the bottom of the tank.
Shank: The shank is a long, cylindrical part of the fill valve that extends down into the tank, connecting the valve to the nut and washer.
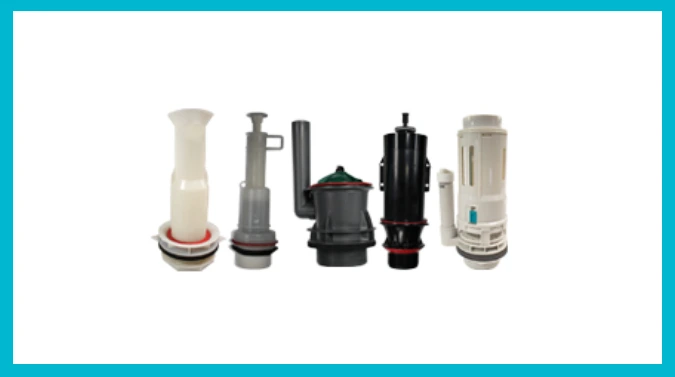
Types of fill valves in toilets
Understanding the specific type of valve can help ensure that cleaning is done correctly, efficiently, and without causing damage to the valve or toilet. Some valves may have specific instructions or precautions to be followed to maintain their proper function.
Ballcock fill valve: This is the most common type of fill valve and operates using a float ball connected to a valve by a shaft.
Diaphragm fill valve: A diaphragm fill valve uses a flexible diaphragm to control the flow of water into a tank rather than a float.
Piston fill valve: A piston fill valve uses a piston to deal with the flow of water into the tank, allowing for precise adjustments to the water level.
Dual flush fill valve: A dual flush fill valve is designed for toilets with a dual flush system, allowing the user to choose between a full flush or a reduced flush, conserving water.
Gravity fill valve: A gravity fill valve relies on gravity for water flow control, rather than a float or a piston.
How do you clean fill valve seals?
Cleaning fill valve seals are an essential part of maintaining the performance and longevity of your toilet. Over time, grit can build up on the seal, causing it to wear out or become clogged. There are a few quick steps you can take to clean your fill valve seals and keep them in top condition.
Shut off the water supply to your toilet. Remove the tank lid and flush the toilet to empty it. Once the tank is empty, unscrew the fill valve from its mounting bracket and remove it from the tank. Use a damp cloth or sponge to wipe away any organic matter that has built up on the seal.
You can also use a soft brush or toothbrush to scrub away any stubborn residue gently. Be sure not to use any harsh chemicals, as this could damage the seal. Reassemble your fill valve and re-start the water supply. This will help ensure that your fill valve seals remain in good condition for years.
By following these steps regularly, you can keep your fill valve seals clean and functioning properly for a long time. Doing so will help ensure that your toilet continues to work efficiently and effectively without any problems arising from clogged or worn-out seals.
How Do You Clean a Dual Flush Toilet Fill Valve?

If you notice that the water control/fill valve in your toilet shuts off but leaks slowly, it may be time to clean it of debris. To do this, begin by turning off the water supply and flushing the toilet to empty the tank.
Then unscrew the armature from the fill valve and carefully pull it out, keeping one finger on the valve piston. Remove the piston and flush any muck out with a garden hose. Use vinegar and an old toothbrush to dissolve and break off any calcium or mineral build-up on the outside of the fill valve.
Reassemble all parts of the fill valve and turn on the water supply again. Test your work by flushing your toilet several times to ensure no more leaks or issues with your dual flush toilet fill valve.
Why Should You Clean Toilet Fill Valves?
Improved efficiency: A clean fill valve operates more efficiently, reducing the likelihood of clogs and other issues that can negatively impact the toilet’s performance.
Consistent water level: A clean fill valve maintains a consistent water level in the tank, ensuring a proper flush every time.
Water conservation: By functioning properly, a clean fill valve helps conserve water and reduce water waste.
Extended lifespan: Regular maintenance and cleaning of the fill valve can extend its lifespan and reduce the need for costly repairs or replacements.
Good hygiene: A clean fill valve helps maintain good hygiene in the bathroom by reducing the buildup of bacteria and other contaminants.
Water quality: Clean fill valves improve water quality, reducing the buildup of mineral deposits and other contaminants.
Cost savings: By reducing water waste, extending the lifespan of the fill valve, and reducing the need for repairs, a clean fill valve can save money in the long run.
Peace of mind: Knowing that the fill valve is functioning properly and cleanly provides peace of mind and helps ensure that the toilet is always ready when needed.
Better bathroom experience: With a clean and properly functioning fill valve, users can enjoy a better bathroom experience with a proper flushing toilet and improved hygiene.
Environmental responsibility: By conserving water and reducing waste, a clean fill valve helps promote environmental responsibility and protects natural resources.
What are the Common Problems with Toilet Fill Valves?

A properly functioning toilet fill valve ensures a smooth flushing experience and avoids costly water waste. Various factors, such as detritus buildup, deterioration, and leaks, can cause problems with your toilet fill valve.
By understanding these issues and taking proactive measures, you can maintain the health of your toilet and avoid costly repairs. Here below, we will explore the common problems.
Running Toilet: A running toilet is caused by a fill valve not shutting off properly. This can result in water continuously flowing into the tank, leading to water waste and higher water bills.
Leaking Fill Valve: A leaking fill valve can result in water seeping out of the valve and onto the floor, causing water damage and increasing maintenance costs.
Inconsistent Water Level: If the level of water in the tank is not consistent, it can result in inadequate flush power, leading to clogs and increased maintenance.
Clogged Refill Tube: A clogged refill tube can prevent water from flowing into the tank, resulting in a low water level and poor flush power.
Worn-Out Float: Over time, the float in a fill valve can become worn out and lose its buoyancy. This can result in inconsistent water levels and inadequate flush power.
Broken Valve Mechanism: A broken valve mechanism can result in water not flowing into the tank or in an uncontrolled flow of water, leading to overflowing and water damage.
Malfunctioning Adjustment Screw: A malfunctioning adjustment screw can result in an inconsistent water level and inadequate flush power.
Keep Your Toilet Clean: Learn How To Clean The Fill Valve Today
Now that you know how to clean the fill valve on your toilet, you can easily ensure a more hygienic and comfortable bathroom experience. With a few simple steps, you can quickly eliminate any matter clogging up the fill valve and keep your toilet running smoothly for longer.
Plus, regular maintenance of your toilet’s fill valve helps maintain water pressure and prevent potential leaks from occurring. So don’t hesitate to give it a good scrub every once in a while.

