You can definitely install luxury vinyl plank (LVP) flooring in your bathroom, as long as you choose 100% waterproof options with SPC cores designed for high humidity.
Proper subfloor preparation, vapor barrier installation, and careful sealing of expansion gaps with 100% silicone caulk are vital to prevent moisture damage and warping.
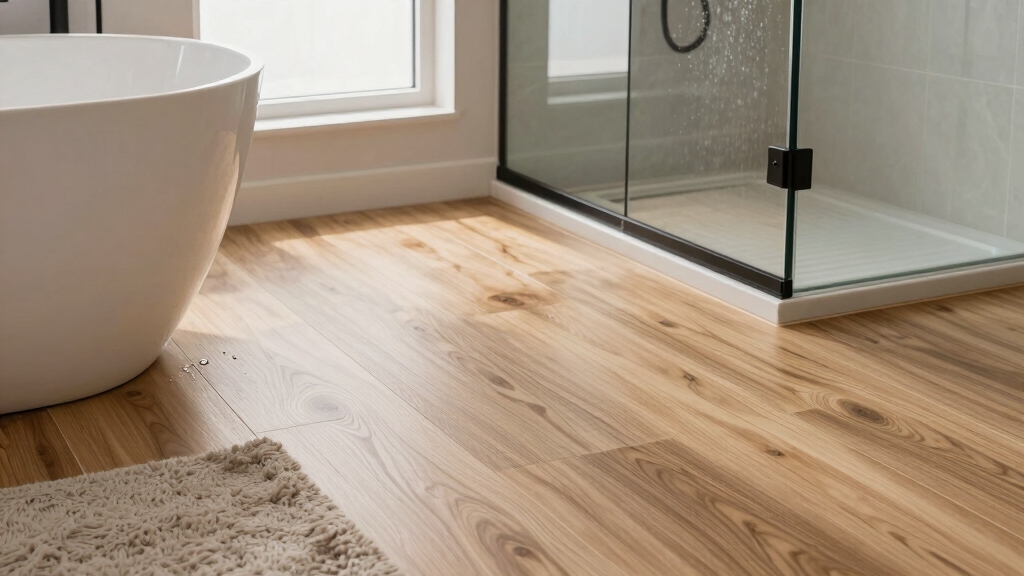
Textured, slip-resistant surfaces add safety and style, while precise cuts around fixtures ensure a seamless fit. Keep following to uncover key steps for a flawless bathroom LVP installation.
Key Takeaways
- LVP with a 100% waterproof SPC core is ideal for bathrooms due to excellent moisture resistance and stability in high-humidity environments.
- Proper subfloor preparation, including moisture testing and vapor barrier installation, is essential to prevent moisture damage under LVP in bathrooms.
- Maintain a consistent 1/4-inch expansion gap around walls, tubs, and vanities, sealed with 100% silicone caulk for waterproofing and durability.
- Textured, slip-resistant LVP finishes enhance bathroom safety by reducing the risk of slips on wet surfaces.
- Avoid water-resistant caulks; use 100% silicone caulk to seal seams and expansion gaps to ensure lasting protection against humidity.
Why LVP Is Ideal for Bathroom Floors?

When you choose luxury vinyl plank (LVP) for your bathroom floors, you’re opting for a material designed to guarantee moisture resistance without compromising style or durability.
LVP offers exceptional water resistance, making it ideal for high-humidity spaces like bathrooms. Its stone plastic composite core enhances stability, preventing warping and swelling common with other flooring types.
You’ll appreciate how LVP mimics natural wood or stone textures, adding aesthetic appeal without demanding intensive maintenance. Plus, its resilience against daily wear and tear guarantees lasting performance.
Easy installation and compatibility with various subfloors further simplify your renovation process. By selecting LVP, you balance functionality and elegance, creating a bathroom floor that endures moisture challenges while elevating your space’s overall look and feel.
Many LVP products also feature textured, slip-resistant finishes, improving safety in wet bathroom environments.
Choosing 100% Waterproof LVP for Bathrooms
Selecting 100% waterproof luxury vinyl plank (LVP) is essential to ensure your bathroom floor withstands constant moisture without damage.
You want LVP with stone plastic composite (SPC) cores, designed specifically for high-humidity areas.
Avoid products labeled merely “water-resistant,” as they won’t endure prolonged exposure to steam and spills.
When browsing, check that the manufacturer guarantees complete waterproofing and look for a robust wear layer for durability.
Choose planks with a textured surface to enhance slip resistance while maintaining an elegant finish.
This combination guarantees your bathroom floor stays intact, attractive, and safe over time.
Prioritizing 100% waterproof LVP means you protect your investment and enjoy a stylish, low-maintenance floor that confidently handles bathroom moisture.
Additionally, selecting materials with proven chemical and physical stability ensures long-term resistance to moisture and wear in bathroom environments.
Preparing Your Bathroom Subfloor for LVP Installation
Before you dive into installing LVP, it’s super important to check your bathroom subfloor for moisture. This step can save you from potential headaches down the road. Start by giving the surface a good sweep and vacuum. You want it to be clean, dry, and level so that your flooring adheres perfectly.
Next up, don’t forget to install a vapor barrier. A typical choice is 6-mil plastic sheeting. This little layer will help protect against any moisture that might rise up from concrete subfloors. Trust me, taking these steps will make a big difference in the long run!
Also, in areas with colder climates, consider using materials designed to prevent moisture-related issues similar to how dry-pipe systems are used in garages to avoid freezing problems.
Moisture Testing Importance
Ensuring your bathroom subfloor is dry and stable plays a critical role in the successful installation of luxury vinyl plank (LVP) flooring.
Before laying down any planks, use a reliable moisture meter to measure moisture levels across the entire subfloor surface.
Excess moisture can cause warping, mold growth, and adhesive failure, compromising your flooring’s integrity.
Aim for moisture levels specified by your LVP manufacturer, typically below 4% for wood subfloors and under 3 pounds per 1,000 square feet in 24 hours for concrete.
Testing multiple spots helps you identify hidden damp areas that need addressing.
Additionally, avoiding materials like PVC in plumbing near heated areas is important due to its temperature limitations and potential health risks.
Subfloor Cleaning Steps
When preparing your bathroom subfloor for LVP installation, start by thoroughly sweeping and vacuuming the surface to remove dust, debris, and any loose particles that could interfere with adhesion or cause unevenness.
Next, inspect the subfloor for any stubborn residues, adhesive remnants, or grease spots. Clean these areas with a mild detergent solution and allow them to dry completely.
Check for any nails or protrusions and remove or countersink them to guarantee a flat surface. If you’re working over existing tile, ensure grout lines are level or filled to avoid telegraphing beneath the planks.
Finally, confirm the subfloor is completely dry and free from moisture, as any dampness can compromise the vinyl’s longevity and performance. A clean, smooth subfloor sets the stage for a flawless LVP installation. Additionally, proper moisture control is essential to prevent damage similar to how insulation protects pipes from moisture and extends their lifespan.
Vapor Barrier Installation
After thoroughly cleaning and confirming your subfloor is dry, the next step involves installing a vapor barrier to protect your LVP from moisture damage.
For concrete subfloors, lay down a 6-mil plastic sheeting evenly, ensuring full coverage without wrinkles or gaps.
Overlap seams by several inches and seal them with 100% silicone caulk to prevent water infiltration.
If you’re using cork underlayment, place it atop the vapor barrier for natural moisture resistance.
Be meticulous around edges and fixtures, sealing expansion gaps and seams carefully to block humidity.
This layer acts as an essential shield, preserving your vinyl planks’ integrity in high-moisture bathroom environments.
Proper vapor barrier installation optimizes durability, maintaining both function and aesthetic appeal of your flooring for years to come.
For additional protection against sediment and debris that can affect plumbing, consider installing a sediment filter to maintain water quality in your bathroom.
Installing Vapor Barriers and Moisture-Resistant Underlayments
Because bathrooms constantly face high moisture levels, installing an effective vapor barrier and moisture-resistant underlayment is essential before laying luxury vinyl plank (LVP) flooring.
Start by placing a 6-mil plastic sheeting vapor barrier over concrete subfloors to block moisture migration.
If you’re installing over wood or tile, choose a moisture-resistant cork underlayment that naturally repels humidity and provides sound insulation.
Make certain all edges and seams are tightly sealed with 100% silicone caulk to prevent water infiltration.
Before installation, confirm the subfloor is clean, dry, and level to maximize barrier effectiveness.
Properly installing these layers not only protects your LVP floor but also enhances durability.
It maintains the bathroom’s aesthetic by preventing warping and mold growth underfoot.
Additionally, ensuring all joints are airtight during installation helps prevent gas seepage into living spaces, contributing to a safer bathroom environment.
Planning Your LVP Layout Around Bathroom Fixtures
To effectively plan your LVP layout, it’s essential to start with accurate measurements of your bathroom fixtures. You can use contour gauges or templates—these tools really help ensure that your cuts are precise.
Don’t forget to leave a consistent ¼-inch expansion gap around all the fixtures and walls. This allows for any natural movement in the flooring, which is super important for durability.
Additionally, choosing waterproof, non-porous surfaces for your bathroom can help prevent moisture damage and maintain the flooring’s appearance over time.
Measuring Fixture Footprints
Accurately measuring fixture footprints is essential when planning your LVP layout around bathroom elements to guarantee a seamless fit and professional finish.
Begin by using a contour gauge or creating cardboard templates to capture the exact shape of sinks, toilets, and tubs. This precision prevents awkward gaps or uneven cuts later on.
Measure carefully around edges, noting curves and recesses, and transfer these dimensions onto your planks before cutting.
Keep in mind to leave space for expansion gaps around fixtures to allow natural flooring movement.
By mapping out these footprints meticulously, you make certain each plank fits perfectly, enhancing both the appearance and durability of your bathroom floor.
This thoughtful preparation elevates your installation from functional to flawless, blending aesthetics with practicality effortlessly.
When cutting LVP around fixtures, using steady, controlled pressure ensures clean, precise cuts that fit snugly without damaging the material.
Managing Expansion Gaps
When planning your LVP layout around bathroom fixtures, you’ll need to carefully manage expansion gaps to guarantee the flooring can naturally contract and expand without damage.
These gaps are essential to prevent buckling or warping, especially in moist environments. Focus on leaving a consistent ¼-inch gap around all walls, fixtures, and permanent elements.
Keep these tips in mind:
- Use spacers to maintain uniform gaps during installation.
- Avoid fastening planks directly to fixed fixtures.
- Caulk expansion gaps near tubs and vanities for waterproofing.
- Make certain cuts around toilets and cabinets honor the gap for proper movement.
Additionally, using sound-deadening materials such as rubber or neoprene pads beneath appliances can help reduce noise transmission in areas prone to moisture.
Essential Tools for Bathroom LVP Installation
Gathering the right tools guarantees your bathroom LVP installation proceeds smoothly and precisely.
You’ll need a sharp utility knife for clean cuts and a rubber mallet to gently tap planks into place without damage. A jigsaw with a fine-tooth blade is essential for detailed cuts around fixtures.
Use a tapping block and pull bar to securely lock planks, ensuring tight seams. Spacers maintain the vital ¼-inch expansion gap, and blue painter’s tape helps keep them in position along walls.
For glue-down installations, a notched trowel applies adhesive evenly, while a floor roller firmly bonds planks, preventing future lifting.
Equipping yourself with these tools guarantees a professional finish and durable, waterproof flooring in your bathroom space.
Cutting and Fitting LVP Around Toilets and Vanities
With your tools ready, you can move on to cutting and fitting LVP around toilets and vanities, where precision matters most. Accurate cuts guarantee a seamless, professional finish that complements your bathroom’s aesthetic while accommodating plumbing fixtures.
Focus on these key steps:
- Measure fixture footprints carefully using contour gauges or templates.
- Score and snap planks or use a jigsaw with a fine-tooth blade for precise cuts.
- Leave a ¼-inch expansion gap around toilet flanges and vanity bases.
- Insert planks at an angle, locking the tongue and groove with gentle pressure.
Sealing and Caulking Bathroom LVP to Prevent Water Damage
Seal all edges and seams of your bathroom luxury vinyl plank (LVP) flooring with 100% silicone caulk to create an impermeable barrier against moisture.
This step is critical to prevent water infiltration, especially around fixtures, bathtubs, and wall junctions.
Carefully apply a smooth bead of caulk along expansion gaps and where the planks meet baseboards or cabinetry, ensuring full coverage without gaps or bubbles.
Use a caulk smoothing tool or your finger dipped in water for a clean, professional finish.
Avoid water-resistant caulks, as they won’t provide lasting protection against constant humidity.
Proper sealing not only guards against water damage but also enhances your floor’s aesthetic by creating seamless transition points.
This attention to detail preserves both the integrity and appearance of your bathroom LVP flooring.
Finishing Your Bathroom Floor With Transitions and Expansion Gaps
Although your luxury vinyl plank (LVP) installation is nearly complete, properly finishing your bathroom floor with connectors and expansion gaps is essential to guarantee durability and a polished look.
These elements accommodate natural plank expansion and contraction, preventing buckling or gaps over time.
When finishing your floor, focus on:
- Leaving a consistent ¼-inch expansion gap around all walls and fixtures.
- Installing connector strips at doorways and threshold areas for smooth visual flow.
- Sealing expansion gaps near bathtubs and permanent fixtures with 100% silicone caulk to maintain waterproofing.
- Checking that toilet flange heights align correctly with the finished floor for a secure fit.
Frequently Asked Questions
How Long Does LVP Flooring Typically Last in a Bathroom?
You can expect luxury vinyl plank (LVP) flooring in your bathroom to last 10 to 20 years when properly installed and maintained.
Choosing 100% waterproof planks and sealing edges with silicone caulk protects against moisture damage, extending lifespan.
Routine cleaning and avoiding harsh chemicals also help preserve the finish.
With vigilant care and attention to subfloor prep, your LVP will maintain its durability and aesthetic appeal well beyond a decade.
Can LVP Be Installed Over Radiant Floor Heating Systems?
Absolutely, you can confidently combine LVP with radiant floor heating systems.
Luxury vinyl plank’s low thermal resistance allows warmth to weave wonderfully through your floors, creating cozy comfort.
Just make certain the heating system doesn’t exceed manufacturer temperature limits, typically around 85°F, to prevent plank damage.
Proper preparation and installation preserve performance and prevent warping.
What Is the Best Way to Clean and Maintain LVP in Bathrooms?
To clean and maintain LVP in bathrooms, you’ll want to sweep or vacuum regularly to remove dirt.
Mop with a damp microfiber mop using a gentle, pH-neutral cleaner. Avoid harsh chemicals or abrasive tools.
Wipe up spills promptly to prevent moisture buildup. Seal edges with silicone caulk to stop water infiltration.
Periodically check and reseal caulk lines for waterproofing. This keeps your floor looking pristine and extends its lifespan beautifully.
Are There Any Health Concerns With Installing LVP in Small Bathrooms?
You won’t face significant health concerns installing LVP in small bathrooms if you choose high-quality, 100% waterproof vinyl planks with stone plastic composite cores.
Make certain proper ventilation during installation to avoid inhaling fumes from adhesives or sealants.
Use low-VOC products and seal edges with silicone caulk to prevent mold growth.
Regular cleaning and moisture control will keep your bathroom safe, fresh, and hygienic without compromising indoor air quality.
Can LVP Flooring Be Repaired if Damaged in a Bathroom Setting?
Yes, you can repair LVP flooring in bathrooms if it gets damaged.
Start by carefully removing the affected plank using a utility knife or tapping block to disengage it without harming adjacent pieces. Replace it with a matching plank, ensuring you maintain the proper expansion gaps.
Seal edges with silicone caulk. Regular maintenance and prompt repairs will keep your bathroom floor looking seamless and protect against moisture infiltration.
Design a Bathroom Floor That Works as Hard as It Looks
You’ll be glad to know that over 70% of homeowners now choose LVP for bathroom floors due to its waterproof durability and stylish look.
By selecting 100% waterproof LVP, prepping your subfloor properly, and sealing edges carefully, you’ll create a bathroom floor that’s both beautiful and resilient.
With the right tools and attention to detail, your LVP installation will stand up to moisture while enhancing your space’s elegance and comfort.

